
Hello friends, and welcome back to Desert Nomad. This week is a pretty big one for Black Desert, as I’m sure you’re all aware. At some point this week, the game is getting the siege patch — as of today, the update has been delayed until Friday. For players who are inclined toward PvP, this update is a major one, as it will finally allow guilds to duke it out for control of nodes and entire continents in hopes of earning the bragging rights (and not to mention the sweet, sweet tax money) that comes with victory.
In preparation for the grand premiere of Node and Conquest Wars, Daum released a handy-dandy manual on Siege Warfare 101 to prep players on how everything’s gonna work. If you’ve taken a look at it, however, you may have noticed that it’s not exactly a quick and easy read; there’s a lot of information to take in, but it’s all sort of scattered throughout the manual. So today, I’d like to try to break down the basic mechanics of Node and Conquest Wars for more convenient digestion.
Let’s take this from the top: The siege warfare update is introducing two similar but distinct features to the game: Node Wars and Conquest Wars. Node Wars are, as the name suggests, battles in which competing guilds vie for control of the various nodes throughout the game. Conquest Wars are similar to Node Wars, but whereas Node Wars are fought over the control of individual nodes, Conquest Wars are fought for control of entire continents. Any guild that emerges victorious in either a Node War or a Conquest War will gain control of the conquered node or continent, allowing them to collect a hefty chunk of tax money into the guild coffers.
So, now that we know what Node and Conquest Wars are, how do we go about taking part in them? Well, the officially provided siege warfare manual breaks it down into six sections: Build a fort, build fort annexes, building strategy, ops, battle, and of course, win! We’ll take a look at each of these steps in more detail in a minute. The rules for both Node Wars and Conquest Wars are similar, though there are a few key differences. For the sake of simplicity, I’m going to start by going over the mechanics of the smaller-scale Node Wars, which will make it much easier to explain Conquest Wars by way of contrast.
Node Wars
 Here’s the quick and condensed version of the flow of a Node War: First, each competing guild has to pick a node that is the target of an upcoming Node War. Each guild then has to build and upgrade a fort in the battle area around that node. When the Node War begins, all guilds competing for a node battle it out. The objective is simple: destroy all enemy forts while defending your own.
When time runs out, if only one guild’s fort is left standing, that guild gains control of the node (and the accompanying tax money) for the following week; if two or more guilds’ forts are still upright, however, the battle is considered a draw and the contested node is considered to be “emancipated” and under no guild’s control. Each Node War is either two or three hours long – at one point in the manual, it says that Node Wars take place from 20:00 to 23:00, while at another it says 20:00 to 22:00, and I’m not sure which is correct.
Now then, let’s take a step-by-step look at the process of participating in a Node War. If your guild wants to battle for glory and riches, the first order of business is to decide which Node War you want to fight in. There are two major factors to consider in doing so: the day of the week on which you want to fight and the level of the node you want to fight for.
Node Wars take place on a daily basis from Sunday through Friday – Saturday is reserved for the Conquest War. Each day, the exact nodes that are up for grabs changes. Nodes are divided into groups based on the regions in which they are located, and the Node War for a given node will always take place on the channel that corresponds to the region in which it is located. That is to say, if you’re fighting in a Node War for control of a node in the Calpheon region, the Node War itself will take place on Calpheon channel 1.
Nodes are also divided into levels ranging from one to three. Higher-level nodes, of course, provide greater rewards for the guilds that control them, but higher level nodes will likely mean fiercer competition as well. The manual suggests that smaller guilds should aim for level 1 nodes, mid-sized guilds should aim for either level 1 or level 2 nodes, and large, battle-hardened guilds should set their sights on level 3 nodes.
The manual provides a series of helpful charts to help players figure out which nodes are up for grabs on a given day, but let’s take a look at just one of them to help illustrate the matter:
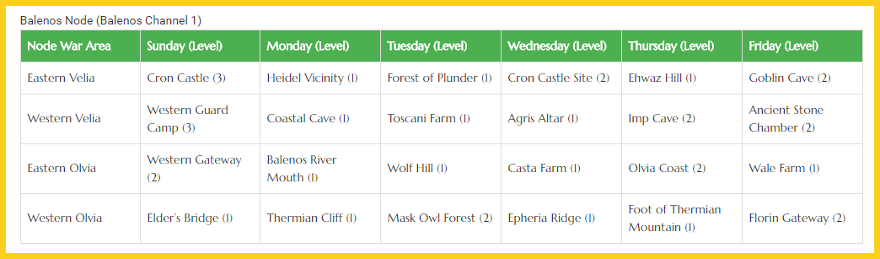
This is the Node War chart for nodes in the Balenos region, which means the wars themselves will be held on Balenos channel 1. As you can see, each plays host to four Node Wars in the Balenos region. On Sunday, players can choose to fight for the Cron Castle and Western Guard Camp nodes, both of which are level 3 (indicated in parentheses next to the node’s name), the Western Gateway node, which is level 2, and the Elder’s Bridge node, which is level 1. Each day, the nodes change – on Monday, for instance, all the available nodes are level 1 nodes.
Building up your fort
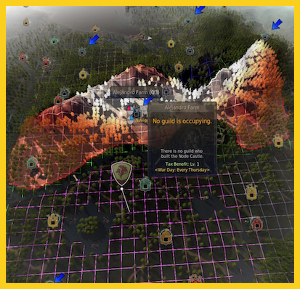
You get the idea. So your guild has settled on a target node; what’s next? Now you have to scope out the area in which the Node War is going to take place and figure out where you want to build your fort. To simplify the task, you can open your world map and click the button in the upper-right hand corner that looks like a pair of crossed swords; this will change your map to the Node War view.
While in this view, click on the node you’re planning to fight for and your map will display a highlighted area around the node; this area is creatively referred to as the Node War Region. As I understand it, forts can be constructed anywhere within this region, so it will probably be advantageous to scout out the area’s topography and build your fort in an area that will be easily defensible.
 Once you’ve found the perfect spot for your base of operations, it’s finally time to actually build the sucker. Forts for Node Wars can be purchased for 100,000 silver from a Guild Manager NPC in any major city, and according to the manual, they come in two varieties. The manual doesn’t explicitly state what the difference between these two types are, exactly, but the tooltip for one of the forts, which is displayed in a screenshot, states that it “requires less material to save time, but it is less durable,” so presumably the other type of fort requires more materials but is more durable. It’s also worth pointing out here that only guild masters and vice-masters can actually build the forts.
Once you’ve purchased your fort from a Guild Manager, all that’s left is for a guild master or vice-master to head over to the chosen spot and right-click the fort, which will enter “installation mode.” Then just confirm which battle you’re taking part in, and voila. But hold your horses, both literally and figuratively—that’s just the easy part.
Once the fort has been “installed,” which you can think of as laying the foundation, it’s time for the whole guild to come together in a concerted effort to actually build the thing before the battle begins. Guild members will be responsible for gathering the requisite materials and sending workers from nearby cities to carry out the actual construction of the fort. If construction on your guild’s fort isn’t 100% completed by the time the Node War actually begins, you won’t be able to take part in the fight, though it’s unclear what happens to any materials that had already been invested in the fort’s construction.
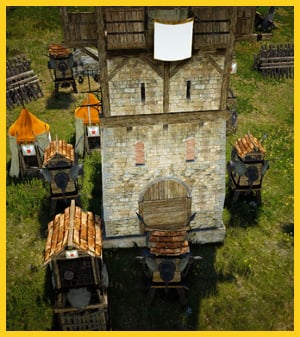
But let’s say that’s not a problem and your guild finishes constructing your fort with time to spare. Well, that’s good, because erecting your initial fort is only part of the preparations necessary to help ensure victory on the battlefield. The next order of business is to construct fort annexes that will provide invaluable defenses, armaments, and services in the battle to come.
As you can see from the chart below, there are a total of seven different fort designs to choose from when constructing your fort, though the exact designs that will be available depend on a number of factors such as the type of war for which the fort is being constructed (Node or Conquest), the level of the node at which the fort is constructed (in the case of Node Wars), and the territory in which the fort is constructed (in the case of Conquest Wars).
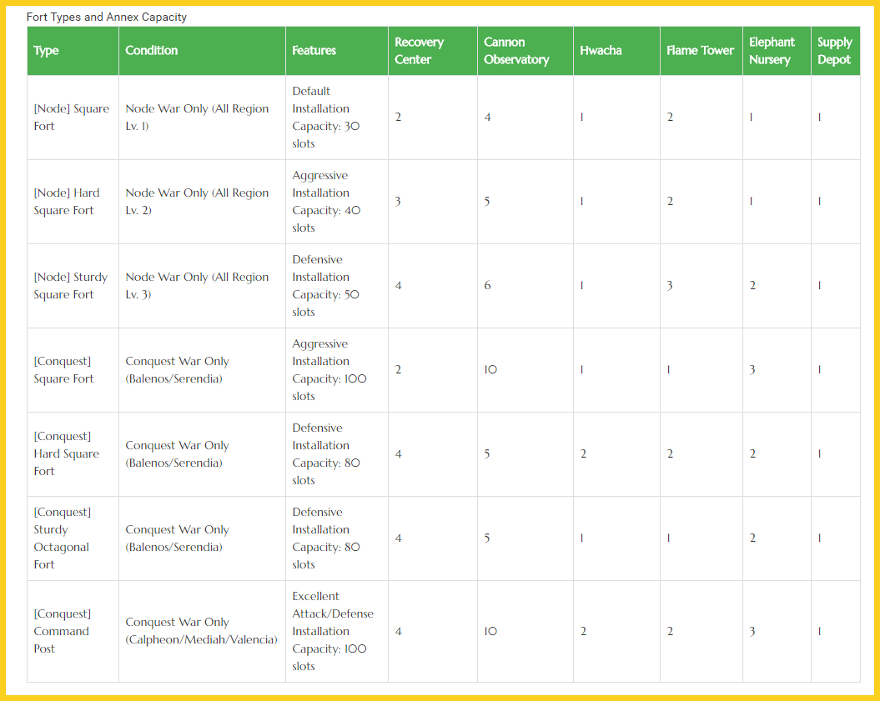
But we don’t really need to worry about that right now. Here, we primarily wanna pay attention to two key details: First, under the column labeled “features,” each fort design has a numerical capacity value. This number determines the total number of annexes that can be built onto a fort of that design. Second, in the last six columns, you’ll see the maximum number of each specific annex that each fort design can support, e.g. the basic Square Fort can have no more than two Recovery Center annexes, four Cannon Observatory annexes, etc.
Each annex also has a related “size” value, which is a numerical score that indicates, of course, the size of that type of annex. As you probably figured, the combined size values of all annexes built on a fort cannot exceed that fort’s capacity value. That’ll probably make a little more sense once we’ve taken a look at each annex in detail, so let’s go ahead and do that now.
Fort Annexes
First off, we’ve got the Recovery Center annex, which has a size value of 1. When you die during a Node War, you’ll probably most frequently resurrect at your guild’s fort. By default, doing so restores you to live with a measly 1% of your maximum HP, which isn’t likely to keep you upright for long. Each Recovery Center annex built on a fort increases the amount of HP recovered when resurrecting at that fort by 25%. The increase is additive, so resurrecting at a fort with four Recovery Centers will instantly restore 100% of a character’s health.
Next up is the Cannon Observatory annex, which has a size value of 3. Cannon Observatories are not, I was shocked to find out, places where you can go to look at cannons in their natural habitat; in fact, fort defenders can interact with Cannon Observatories to produce cannons that will almost certainly prove invaluable in fending off attacking infantry and siege weaponry alike. It takes five minutes of production time to create a cannon, and once a cannon has been created, it is placed in the creator’s inventory, from which it can be deployed anywhere – within a certain vicinity of the fort, I’d assume. A single Cannon Observatory can create an unlimited number of cannons, but only one cannon per observatory can be deployed at any given time. Cannons require ammunition in the form of shells, which the manual states can be produced through “in-house manufacturing,” though I’ll be damned if I know what exactly that means.
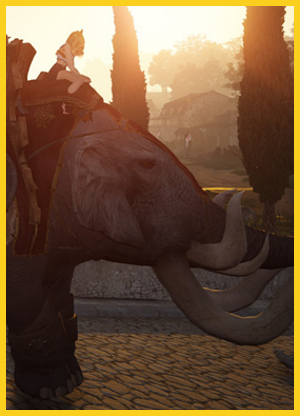
The third type of annex is the Elephant Nursery, with a size value of 5, which can be used by guild members to summon an elephant from the guild stables once every 12 minutes after the war begins. That’s cool and all – if there’s one thing the Persian empire proved, it’s that elephants make pretty badass siege weapons – but if you’re gonna call something an Elephant Nursery, you can’t act surprised when someone – not naming names here – gets his hopes up that he’ll be able to go there and bottle-feed baby elephants. Just saying. When a war starts, all guild elephants that are in the channel in which the war is taking place will be instantly moved to the guild stables for easy access on the battlefield. A guild can build one Elephant Nursery annex for each elephant in the guild stable.
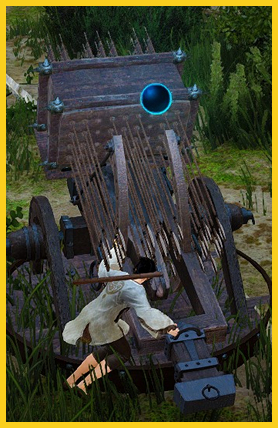 Annexes four and five are the Hwacha and Flame Tower annexes, which are mountable weapons that serve as a fort’s primary anti-infantry armaments. A hwacha, in case you’re curious and don’t feel like opening a new tab to Google it, is a Korean siege weapon that basically looks like someone weaponized one of those Saturn Missile fireworks you bought that one time from some guy on the side of the interstate in Nowhere, Alabama. It launches barrages of honest-to-god exploding arrows because hell yeah it does. Its excellent range makes it perfect for inflicting early casualties on approaching enemy forces, but the 10 second reload time between each salvo means you’ve gotta make every shot count.
Flame towers, meanwhile, are exactly what they sound like. Seriously, I don’t know what else to tell you here. They’re effective only at relatively close range, but their flame bursts spray in wide arcs, making them deadly to clustered groups of enemy infantry, and they require only three seconds between bursts, so you won’t have to wait too long if you wanna take that pesky Warrior from medium-rare to well done.
Annex number six is the Supply Depot, which has a size value of 5. The Supply Depot annex is, surprisingly enough, a depot of supplies, and it provides a few different services. For starters, it allows the master and vice-masters of the guild to access the guild shop, from which they can purchase “guild-only potions” as well as ammunition for flame towers and hwacha. Secondly, it can be used by guild members of any rank to repair their equipment. And lastly, it provides all members access to a stable, though it’s worth noting that the stable at a Supply Depot can’t be used to remotely retrieve horses or camels that are outside of the Node War area; it’s only there so that players can revive any mounts that have been killed during the war itself.
That takes care of all the major annexes, but there are three more “minor” annexes worth mentioning: barricades, siege towers, and traps. Barricades are, of course, defensive walls that can be set up around a fort’s perimeter to impede and bottleneck attacking forces. A single fort can have up to 50 barricades, each of which has a size of 1, and once a barricade is placed, it can then be upgraded to a steel barricade for increased durability (although the manual gives no indication as to what is required to perform said upgrade).
Siege towers are unmanned defensive siege weapons that, once placed, will automatically attack any hostile units within range. The official manual doesn’t list a size value for siege towers, but if the physical size of the in-game model is any indication, I’d guess somewhere between 2 and 4. And lastly, there are traps, which come in a variety of flavors, though the only one explicitly mentioned is the elephant trap which, surprisingly enough, is designed to disable enemy siege elephants. Traps can be planted anywhere, “regardless of the fort location,” and they can even be used outside of Node and Conquest Wars in standard, open-world PvP.
Strategy and death
Moving on, I’m mostly going to skip over the “Building Strategy” and “Ops” sections of the manual, primarily because the information within is more or less common sense, such as – and I quote – “As always, do whatever you do.” Sage advice indeed. There is one nugget of information in the “Ops” section that’s worth knowing, however: When a war begins, enemy forts are not visible on the map (although the number of guilds participating is readily available at all times), but once a member of your guild discovers an enemy fort, it will be marked on all friendly players’ maps as well.
The “Battle! Battle!” section of the manual I’m likewise going to gloss over, as it’s largely comprised of an outline of which units are most effective against others; elephants squish infantry, elephant traps disable elephants, that sort of thing. But there are a few key things to take away from this section: First, the manual states that forts and annexes will take damage from all (or almost all) sources – elephants, cannons, etc. – until they reach 50% health, at which point only characters, i.e. infantry fighters, can damage them. This ensures that most sieges will eventually devolve into, as the manual so eloquently describes it, “a big dirty melee.”
On that note, if you’re worried that your gear isn’t good enough for you to be fighting on the front lines but you still wanna contribute to your guild’s war effort, don’t fret; players are able to repair damaged forts and annexes when they start looking worse for wear. Each individual repair action on a fort or annex requires either one polished stone (for Node War forts) or one blackstone powder (for Conquest War forts).
 Of course, it’s almost inevitable that you’re gonna die eventually, so it might behoove you to know that death works a little bit differently during Node and Conquest Wars. When you die, you won’t be given the option to resurrect instantly via an Elion’s Tear, nor will you be able to resurrect at the nearest node or town; instead, your only option will be to revive at your guild’s fort or outpost. Outposts are basically deployable respawn points that a guild master can place anywhere on the battlefield by using the Flag of Determination guild skill, which can be unlocked in the guild skill tree for 10 guild points and which requires 100 Pledge of the Blood items to activate.
Now what?
Well, at long last you’ve done it: You built a fort, bolstered it with annexes, and held strong against the ceaseless tide of would-be besiegers. When the dust settles, your fort stands where all others fell and victory is yours. Congratulations, you and your guildmates are now the proud owners of a shiny new node. For the next week, your guild’s emblem will appear on the node’s nameplate and flags for all the world to see. More importantly, though, your guild will also be able to collect that node’s taxes for the week, with higher level nodes paying out higher dividends. But if one node hasn’t sated your guild’s lust for conquest, you can go ahead and attempt to take control of an additional node in one of the following days’ Node Wars, but be aware that if you choose to fight for a second node, that node’s level must be equal to or greater than the level of the first node you captured.
But what happens if you and another guild fought to a bitter stalemate and, at the end of the war, two (or more) guilds’ forts remained intact? In this case, the node is considered “emancipated” and is uncontrolled for the next week. That node’s tax money, however, will continue to accumulate. When a guild eventually succeeds in capturing a previously emancipated node, that guild will collect the taxes not only for the week of its occupation but for each week the node was emancipated prior to the conquest. This mechanic will certainly lead to some high value targets that will have guilds clashing over the stockpiled silver.
And there, in just over 3000 words, is a primer on the ins and outs of Node Wars. Not exactly concise, I’ll grant you, but I hope that I’ve made it a little easier to digest than the sometimes vaguely-worded and confusingly organized manual supplied by Daum. But wait, we’re not quite done; what about Conquest Wars?
Conquest Wars
Conquest Wars are mechanically almost identical to Node Wars, except for a few key differences. For one, as I mentioned up in the fort construction section, the types of forts that can be constructed for Conquest Wars are different than those for Node Wars – Conquest War forts tend to have a much higher capacity, among other things, as a result of the difference in scale between the two types of wars.
Secondly, whereas new Node Wars occur every day of the week from Sunday through Friday, Conquest Wars take place only on Saturdays; think of Conquest Wars as the culmination of the Node Wars that were fought throughout the week. In order to take part in a Conquest War, a guild must have taken control of a level 2 or level 3 node during that week’s Node Wars. Otherwise, though, the basic process is the same, only this time the fight isn’t for the control of individual nodes – it’s for the dominion over entire continents.
To reflect the larger scale of Conquest Wars and the consequently greater effort required to emerge victorious, any guild that wins a Conquest War is very handsomely rewarded. In addition to each guild being entitled to collect the taxes from the territory it holds – which is, of course, a significantly larger sum of money than the taxes from any individual node – the leader of each guild that wins a Conquest War will be granted a special crown that, when worn, confers a number of benefits upon the coronated character.
There are a total of five different crowns – one for each region over which Conquest Wars are fought: Balenos, Serendia, Calpheon, Mediah, and Valencia – but only two are shown in the manual: the Silver Mane Horse Crown and the Blue Lion Crown, which are the crowns of Balenos and Serendia, respectively. Both of these crowns (and the others as well, I presume) grant their wearers +50 max HP and +50 max MP/WP/SP. On top of that, each of the five crowns allows its wearer to speak in channel chat without paying the standard cost of one energy point per message sent, as long as they are currently in the channel that is named for the region the crown represents.
That is to say, the wearer of the Blue Lion Crown of Serendia can speak freely in channel chat as long as they are in the Serendia channel. In addition, the crowns of Calpheon, Mediah, and Valencia will allow their wearers to speak in worldwide chat without the use of megaphones, presumably just to make it that much easier to rub your victory into the defeated guilds’ faces.
Good luck!
At long last, I think I’ve covered about all there is to cover in regard to Black Desert’s Node and Conquest Wars. I hope that you feel at least slightly more prepared for the battles ahead, and I wish you all luck in your future conquests. Fight with pride, die with honor, all that good stuff, you dig? Thanks for joining me, as always, and I’ll see you folks next time. Until then, happy warring, Nomads.
 Every other week, join Desert-Nomad-In-Residence Matt Daniel as he wanders the sprawling expanse of Black Desert to discover what secrets lurk beneath its enigmatic sands. Gather ’round the oasis as he figures out how to survive and flourish (or fail spectacularly) on his adventures! And if you’re on the Orwen server and would like to join Matt and other members of the MOP community in our official Black Desert guild, drop him a line in the forum at the guild website!


