

In this week’s Flameseeker Chronicles, I’ll discuss each of the new raid bosses briefly and will outline the premise of the encounter mechanics. I won’t spend long outlining very detailed tips and tactics at this stage since I haven’t been hands-on with everything myself yet, though I will furnish you with some tactics guides as I get more experience post-holidays if there’s demand for them. Note that there will be spoilers for those who haven’t tried the content themselves yet, so bear that in mind before reading on. I’ll avoid totally spoilerific images and will hide big lore points behind tags.
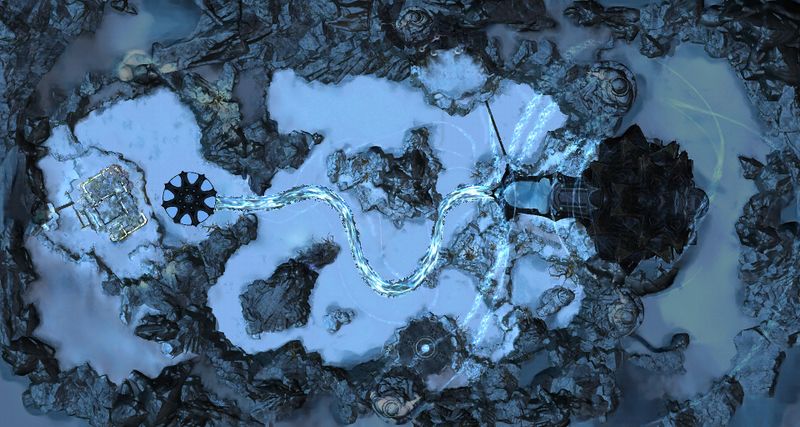 Hall of Chains
The new raid wing ties into many of the strong themes that have been explored in Path of Fire, making it a well-positioned piece of content for those who find context important. Players venture into The Underworld after Grenth’s followers are being murdered for unknown reasons in Tyria. The player discovers an epic clash of powers for control over both the living and the dead, and nothing is at it first appears.
Plenty of reveals happen throughout the encounters, which keeps up the story intrigue, and to my mind, the telegraphing and mechanics are cleaner than we saw in the earlier raid boss encounters (*cough cough* Vale Guardian *cough cough*).
Reveal spoileific gripeSoulless Horror
The first encounter in the new raid wing is the Soulless Horror, a mysterious figure who seems livid that you dare live in the realm of the dead. Two party members (hint: both should be fully capable of tanking) must accept a special action key ability to pull aggro from the horror and the pair needs to then balance a stacking debuff that increases damage taken that only rests after 30 seconds without tanking. Seeking to fix that living-people-in-dead-land problem, the horror throws quite the repertoire of vicious attacks at the party, including an unavoidable wall of instadeath AOE that sweeps the platform in a straight line, flesh wurms that make the beginning of the encounter challenging for parties without an Epidemic-equipped Scourge, a boon-stripping, moving AOE, and giant Flesh Golems that are dealt with by the offtank and a load of CC pops.
These wurms are best kited to the furthest edge of the platform to minimise the damage caused to the party: Their deaths cause a minute-long AOE that also converts boons to conditions, so minimising the affected areas is prudent. There’s a catch, however: The platform shrinks as the fight progresses at 90%, 66%, and 33% HP. There is a challenge mote for the boss, though I’ve not played with it yet: It makes the tanking debuff stack quicker, the platform shrink more, and the pesky Fleshwurms respawn during the encounter instead of only appearing at the beginning.
Reveal lore spoilerRiver of Souls
The River of Souls is a relatively straightforward encounter that relies on precision as the party protects their new ally as they all cross the corrupted river. Movement is everything in this encounter: The party has a protective orb that centres on the NPC guide, though this can be interrupted and the NPC is not immune to damage, so the healers need to pay attention to her health. Saying in the bubble prevents stacks of damage from the river accruing, but there are mechanics in play that make staying in the field permanently impossible, so balancing your time effectively is key. Anything that can help you move should be enabled in your build where you can.
Various enemies and mechanics will interfere here: You’ll be pulled out of the protective sphere and into the damaging river by spatial rifts, players will need to leave the safe zone to drop damaging bombs outside the group, and those wall AOEs are back (though this time you at least get one free death to waste on improper footing). Some enemies focus on our guide more than the players: Enervators drop the shield until they are killed, bombers try to kill her through massive damage and come with defiance bars, and spirit hordes chase the group and damage everyone. Again, a Scourge is useful here for the add control, and I can see that keeping the CC composition from the first fight would also be prudent.
Reveal spoiler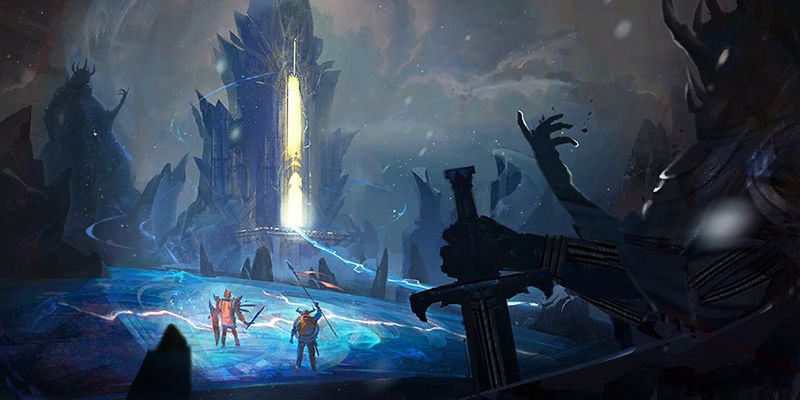 Statues of Grenth
Three events stand between players who successfully traverse the river and their main target: They can be taken in any order and together are dubbed the Statues of Grenth for rather obvious reasons. The Broken King (Ice) statue requires the group’s DPS to be well paced as a green circular AOE with a stacking debuff that freezes players at 4 stacks must be collected, and if DPS happens too quickly this task will overwhelm the party. The party, bar the tank, should stack behind the Broken King.
The Statue of Darkness is much more strategically deep and is where I envision squads will have the most problems: It involves splitting the squad into two teams led by ord throwers who play a key role in the damage dealing capacity of the party. To add to the coordination needed, the two teams must kill their Eyes at much the same time to succeed, all while dealing with a rampaging Minotaur.
Finally, the Stature of Death / Eater of Souls is another convoluted miniboss that involves the strategic splitting of the party to coordinate controlling the Eater of Souls while slaying Twisted Spirits to light a platform the Eater of Souls is standing on to enable the party to kill it. It’s not as simple as it sounds: It reanimates and the first soul collection team needs to stand on a green telegraph to be teleported up to collect 5 orbs in 30 seconds to light torches, while the Eater of Souls can prevent that collection by necessitating the party to use CCs on him first. This repeats for all six platforms until he dies for good. This seems a little clumsy to me, though I’ve not tried it myself yet. Let me know if you have and I’m correct!
 The Voice in the Void
Reveal lore spoilerThe final encounter of the wing seems very challenging indeed: The final battle requires power DPS for mob handling, players to be assigned to a green circle mechanic, and a healer who is comfortable kiting the Messengers. ArenaNet’s penchant for circular arenas with clear zoning comes into play once again in this encounter: seven Reapers of the Underworld are dotted along the outer perimeter and are attempting to summon this boss so that it can be defeated, and the party’s main aim is to keep them alive throughout their ritual. To make the job harder, skeletal enforcers work for the boss and spawn in a clockwise fashion in each corner of the room and focus directly on the Reapers, so the power DPS I mentioned before must work hard to down them before they reach their target since they are vulnerable to physical attacks.
Let’s return to the Messengers I mentioned earlier: These are flesh golems that aggro that kiter and have very intense damage AOEs around them, so players must stay out of range. The kiter is the first to strike the Messenger so parties must ensure the correct person hits them from range and keeps them away from the party for the 20 seconds they exist for. Meanwhile, the boss itself will reach out regularly for a Reaper as well and a player must sacrifice themselves to save them: This means having to reunite their body and soul by — you guessed it! — collecting more orbs. This person needs to rotate in a team of three due to a resultant debuff that lasts for 60 seconds after eating those orbs.
On top of the Reaper-saving mechanics, players must prevent damaging each other: Non-tank players are afflicted with an underfoot pulse that will deal devastating damage to everyone but the targeted player on detonation, so that player needs to move quickly out of range before detonating. Players must stack behind the boss because of an AOE it deals after appearing under a random player’s feet that means all players need to double dodge to avoid losing their soul. There is an unavoidable version of this attack at set times to complicate matters: All players should stand by the wall facing the boss and then should run to the light to reclaim those souls in time. One last thing before the actual boss breaks into play: Two players will be shackled together and must run away from one another to stop a damaging tick from killing them.
The boss becomes active at around the 8-minute mark and seems to be tanked in a corner. There are clear telegraphs for the moves used here so I won’t go into detail (especially since I’ve not yet completed this encounter), but the final push does revolve around more orb collection and dynamic, time-sensitive movement. I’m muddy on how this works even after reading and watching all I could on the fight, so I guess I’ll have to learn for myself!
Final thoughts
The wing is rather intense: I feel that it is a marked step up from all the bosses I have completed. I can tell that the devs have decided to really engage every member of the raid team in these encounters, though I feel that the raid’s iconic orb collection mechanics are rather repetitive, even though it is generally sophisticated in its implementation and is made to feel intuitive. I really loved the telegraphing in this wing and I feel that the raid-wiping mechanics have much clearer indications than some (yep, I’m still bitter about those easily lost blue markers for the Vale teleporters, okay?!).
The pace is everything in these encounters and it really feels like a constant finesse test in this raid. I can’t wait to smash my way through all of these encounters so I can bring you more informative guides but for now, I hope you’ve enjoyed a glimpse of the fights and their settings. This is exhilarating stuff and I feel that it is the strongest offering yet, though it is a little early for me since my guild aren’t speed clearers and we are HoC novices.
Over to you!
Have you tried the new raid yet? If so, what do you think? Let me know your thoughts in the comments, and especially shout out if you would find detailed tactical guides useful.
 Tina Lauro has been playing Guild Wars 2 since it launched and now pens the long-running Flameseeker Chronicles column, which runs every other Wednesday and covers everything from GW2 guides and news to opinion pieces and dev diary breakdowns. If there’s a GW2 topic you’d love to see covered, drop a comment Tina’s way or mail her at tina@massivelyop.com.


