

Next week sees the start of the two week long Secrets of the Abyss event in which players will face a number of repeatable challenges relating to Abyssal Deadspace sites to earn Agency points. The rewards will include exclusive Singularity Storm Triglavian ship skins and valuable mutaplasmids that can enhance ancillary armor repairers and shield boosters. Now is the perfect time to dip your toe into Abyssal Deadspace if you haven’t tried it yet, but what kind of ship setups work in this new PvE mode and how accessible are they to newer players?
In this edition of EVE Evolved, I break down four cruiser fittings (one for each race) that can tackle low-tier Abyssal Deadspace sites, and give some advice on how to use them.
 General advice on Abyssal Deadspace
In this guide, I’ll focus on four standard tech 1 cruiser options that should be accessible and within the price bracket of relatively new players, and which should still be able to tackle tier 1, 2, and possibly also tier 3 sites with some practice. Most of these fits use a microwarpdrive as it’s important to get within range of any battleship spawns as quickly as possible, but you can often get away with an afterburner in tier 1 and 2 sites. It’s also useful to run Gamma sites in passive shield tanked ships for the bonus shield hitpoints and avoid Firestorm if you have low DPS as the enemies will take a lot longer to kill and you could run out of time.
The strategies for flying most of these ships will be similar to the Gila fit I’ve written about before, so follow the advice on tackling each enemy type there closely. When you land in a pocket, you have just a few seconds to locate the enemy ships on your screen and assess the situation accurately. Start moving to get into a close orbit of any battleships on the field as quickly as possible to mitigate their damage, but don’t approach directly in a straight line if there are any webbing or scrambling cruisers in the way and you’re in a fast kiting ship. Kiting ships will also want to try to stay at least 10km from any enemies with special abilities to prevent their use, stay out of the range of heavy hitters such as drone battlecruisers, and prioritise any frigates with special abilities that will be difficult to kite for long.
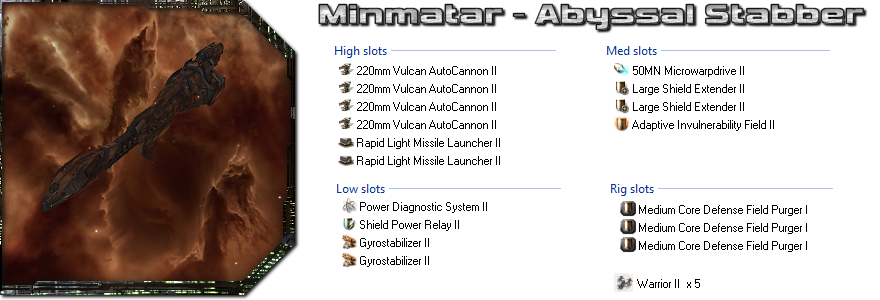
The Stabber is a basic tech 1 cruiser that focuses on speed over everything else, making it a reasonable passive kiting ship for low-tier Abyssal Deadspace sites but one that requires a lot of manual piloting expertise. The setup above can reach over 2,500 m/s without even overloading the microwarpdrive and so can kite almost anything in the abyss, but it only deals about 200-300 DPS in its operational range of 10-20km.
Any tech 2 weapons or modules that you don’t have the skills for can be easily swapped out for tech 1 versions without losing too much effectiveness, but the ship’s damage output is quite low to begin with so you may have difficulty completing tier 3 encounters in under 15 minutes. Some players prefer to splash out on the superior Stabber Fleet Issue or switch to the slower but tankier tech 1 Rupture for an easier time completing tier 1 and 2 filaments.
Ammo choice will be determined mainly by the type of site you’re running, as you want to match your missiles, drones, and projectile ammo type to the resistance penalty given by the site. Republic Fleet EMP M will be ideal for Electrical filaments, Fusion M will be ideal for Gamma filaments (the easiest to complete thanks to the shield bonus it grants you), and Phased Plasma M is a great all-round type for other filament types. Cykkck has a series of videos tacking tier 1 sites using a similar Stabber fit, which you can check out below.

The Vexor is the standard ship most people use for low-tier filaments as it specialises in drones and so can switch its damage type depending on the type of site you’re completing. The setup above can deal about 330 DPS against most targets, or over 500 if they close in to within 10km where you can slow them with dual webs and the Electron Blasters are effective. Always pick drones that deal the same damage type as the resistance penalty of the site you’re tackling as it will increase your effective DPS. This is a slow tank fit rather than a kiting setup, so it can ignore warp scramblers as they won’t affect the afterburner but will need to prioritise any energy neutralising ships on the field that could break the tank.
Head straight for any battleships on the field and try to get close enough to use the webs and blasters, but remember that the afterburner is slow. Spending too long in transit between the enemy ships, the loot container, and the gate to the next area will eat into your 15 minute timer and you could end up running out of time in the more difficult tier 3 sites. Overload the afterburner when necessary to save time, as you can always repair it after the filament is over, or switch it for a microwarpdrive and reduce the guns to Dual 150mm railguns to make it fit. Check out the Pockets Plays video below in which a similar fitting with a microwarpdrive is used in a tier 1 Firestorm site:
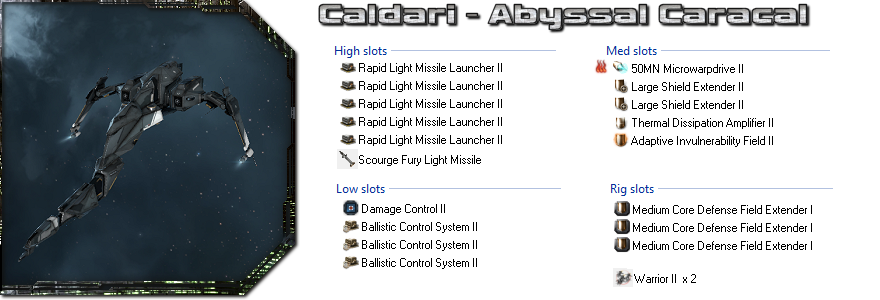
The Caracal is a tech 1 cruiser designed to be a pure missile platform, and the fit above can reliably deal around 400 DPS at a range of over 45km. Its consistent damage output and huge range will let you focus more on kiting, keeping range from enemies with special abilities and keeping your transverse velocity high against battleships and cruisers to evade fire. The ship is very slow with a top speed of only 1,900 m/s, so you won’t be able to kite frigates reliably and will have to focus on them first or overload your microwarpdrive to hit around 2,700 m/s and keep them at arms length long enough to kill them.
Your two light drones won’t contribute significantly to your damage output and the AI likes to shoot them down, so keep them for when you’re attacking any battleships or when the frigates and webbing ships are all down. It can be especially effective to use them against Vedmaks and battleships as there’s a chance that the enemy ship will switch to attacking your drones even though it won’t be able to hit them, removing that enemy’s damage from the field. Check out part two of the Pockets Plays Abyssal prep series below in which a similar Caracal fit is used to tackle tier 1 sites with ease:
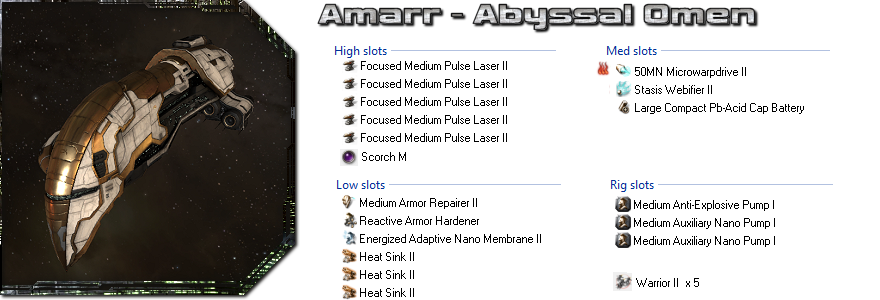
The Omen is an interesting choice for Abyssal Deadspace as it can evade some damage by kiting just like the Caracal but has an active armour tank instead of a passive shield tank. The fit above deals around 400 DPS with Scorch M crystals, has very even resistances across the board, and can reach about 1,900 m/s (2,700m/s when the microwarpdrive is overloaded). It should be flown just like the Caracal fit above by keeping out of range of any cruisers and orbiting battleships in close to evade their fire.
Focus on killing the frigates first, and don’t be afraid to overload the microwarpdrive at the start of each pocket to keep range from frigates until the job’s done. The capacitor battery gives enough cap to hit the microwarpdrive or repairer but not both, so you’ll have to manage your capacitor well and prioritise killing any ships with energy neutralisers. Fly near any tracking pylons you find to help your lasers hit frigates, and carry a set of Imperial Navy Multifrequency M crystals for extra damage when taking down battleships. Check out The Gentleman Gamer’s similar fit in the video below:

I’ve written several guides on running Abyssal Deadspace so far, including two general guides before the expansion launched and later the Expert Gila’s Guide to Abyssal Deadspace that focuses on the Gila pirate faction cruiser. The Gila is still my ship of choice for Abyssal Deadspace and it can tackle all tiers of encounter except Dark type sites, but it costs almost billion ISK in gear and implants to make it comfortably work. We’ve also seen some brilliant high-tier setups for the Sacrilege and other tech 2 cruisers, but these require heavy skill training to fly and are overkill for low-tier sites.
The tier 1 “calm” and tier 2 “agitated” sites can be completed in standard tech 1 cruisers and don’t require a mountain of ISK or skills, but the risks are very real. For those just getting into Abyssal Deadspace for next week’s Secrets of the Abyss live event, I hope this guide has been of some help. I strongly advise anyone giving Abyssal Deadspace a try for the first time to start off cheap with a tech 1 cruiser and no implants to get the hang of it, and proceed into higher tiers with upgraded gear at their own risk!
 EVE Online expert Brendan ‘Nyphur’ Drain has been playing EVE for over a decade and writing the regular EVE Evolved column since 2008. The column covers everything from in-depth EVE guides and news breakdowns to game design discussions and opinion pieces. If there’s a topic you’d love to see covered, drop him a comment or send mail to brendan@massivelyop.com!


