

The past few months have seen a flood of frequent updates hitting EVE Online, and among them we got a whole new class of ship with the Tech 3 Tactical Destroyer. Unlike their cruiser-sized bigger brothers, tech 3 destroyers can transform mid-battle to choose between three separate roles: Defense, Propulsion, and Sharpshooter. These versatile little ships have carved out a niche for themselves in small scale PvP such as Faction Warfare, each functioning as an effective tackler and brawler rolled into one. Tech 3 destroyers can also fit a combat probe launcher to get a warp-in on enemy fleets and have become a popular anti-tackle tool that can snipe from over 50km and track interdictors and interceptors.
I’ve previously written a guide on fitting the Amarr Confessor, the first of the new tech 3 destroyers to be released, but since then a balance patch has made those setups obsolete. Now that all four races have got their own tactical destroyers and the prices have come down to an affordable 35-60 million ISK, I’d like to take a look at how we can fit each of them for PvP. EVE has become a testing ground for dozens of experimental ship setups for each of the tech 3 destroyers as players compete to find out what fitting works best for a variety of situations. The dust has far from settled, but some pretty decent brawling and kiting fits have been gracing the killboards lately and I’ve put together four of my favourite brawling fits. All of the fittings in this article use only tech 2 and named items, but they require good fitting skills and sometimes a 2-3% CPU or powergrid from implants. They’ve been put together with the aid of the fantastic EVE Fitting Tool.
In this edition of EVE Evolved, I look at PvP brawler fittings and strategies for the Amarr Confessor, Caldari Jackdaw, Minmatar Svipul, and Gallente Hecate.
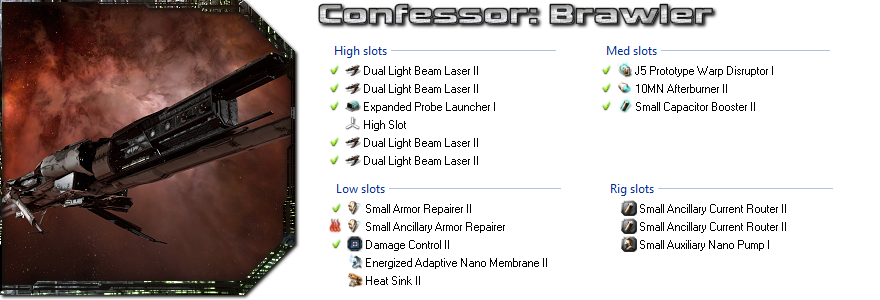 The Amarr Confessor has had a little bit of an overhaul since I last wrote about it; it’s now squeezing its previous damage output into four turrets and opening up two utility high slots. Unfortunately, it doesn’t seem to have enough powergrid to make effective use of those extra high slots, so many players opt to leave them empty to act as heatsinks. To do this, just arrange your weapons on the fitting screen so the empty slots are in the middle and you’ll get an extra 10-20 seconds of overload time before your guns burn out. The above setup is a tanky brawler fit that can dictate range, swap to a kiting role if required, and escape from larger ships with ease.
This fit deals 302 DPS with navy multifrequency crystals (355 when overloaded), tanks up to 332 DPS in defense mode with the ancillary repairer overloaded, and has about 8.1k effective hitpoints. It’s always worth overloading the ancillary repairer as it only holds enough nanite paste to run for 8 cycles anyway and can’t burn itself or other modules out in that time. Use the normal repairer as your main one and pulse the ancillary repairer sparingly when you need the extra boost.
The setup’s special trick is in its oversized 10MN afterburner, which gives speeds comparable to a 5MN microwarpdrive (over 3.1km/sec in propulsion mode when overloaded) but without the added vulnerability of increasing your signature radius. The afterburner is also unaffected by short-range warp scramblers, so you should be able to dictate the range of any engagement with ships of destroyer size or larger. If you’re forced out of range or have to disengage, switching to Aurora S crystals will give you 175 DPS with a 26km optimal range and activating Sharpshooter mode can increase that to 43km. This fit can also be made 200m/s faster by upgrading to a Federation Navy 10MN Afterburner or can be made tankier by switching the Heat Sink II for another Energized Adaptive Nano Membrane II.
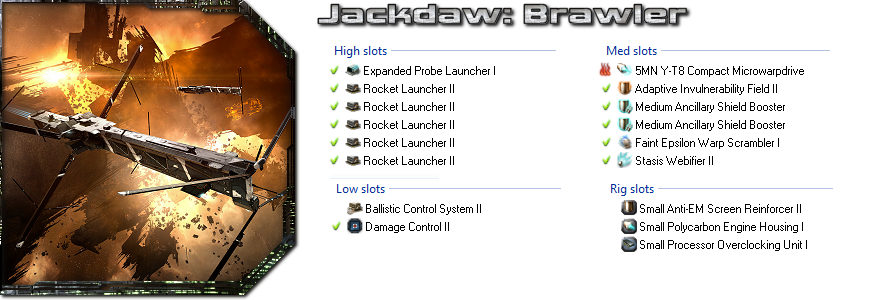 While it’s too slow for a 10MN afterburner fit to work and the flight time of missiles limits its use as a sniper, the Caldari Jackdaw has plenty of mid slots for tackle and tank. There are tons of experimental brawling fits splattered across the killboards right now, but the one above feels balanced. It can reach speeds of 3,129m/s in propulsion mode if you overload the microwarpdrive, but your signature radius will bloom to almost the size of a battleship while it’s active, so only use it when travelling or to close the gap on a target. The warp scrambler will shut down the enemy’s microwarpdrive and the stasis web will counteract the speed from a non-overloaded afterburner. This setup deals 247 DPS with navy rockets at a range of around 10km, making it best suited to tackling slower targets like cruisers.
Switching to defense mode gets you up to about 8.5k effective hitpoints and the two ancillary shield boosters provide another 12.4k as needed, making this tougher than an equivalent tank with medium shield extenders. Use the boosters sparingly and try to use up the charges in one booster before even touching the other. If you manage to use the second booster to stay alive for a full minute while the first reloads, you’ll have an unexpected reserve of 6.2k extra effective hitpoints to dig into that could turn the fight in your favour. Another benefit of the dual ancillary booster fit over a standard buffer tank is that your shield appears to be going down quickly in battle and the enemy will be less likely to disengage if he thinks he can just scrape the kill.
 The Minmatar Svipul is a little different from its Amarr and Caldari counterparts, getting a reduction in the signature bloom caused by microwarpdrives when in defense mode rather than a straight signature radius reduction. This makes the 5MN microwarpdrive a no-brainer on the Svipul and really limits the effectiveness of 10MN afterburner fits. The setup above is a pretty standard brawler fit using smaller 150mm autocannons and a classic combination of speed tanking and some shield buffer. This ship setup is basically a giant rifter; its job is to burn in range quickly to tackle a target and unload as much DPS on them as possible while staying mobile enough to evade enemy fire. It deals up to 416 DPS with rage rockets and Hail S ammo (or 479 DPS when overloaded) and has an impressive 24k effective hitpoint buffer, but it needs to operate at practically point-blank range to apply damage well.
When chasing down fast targets, swtching to propulsion mode and overloading the microwarpdrive will let you reach over 4.2km/sec. This will make its signature radius bloom out to a massive 418m and make you very easy to hit, so try to switch to Defense mode once you’re up to speed. Your signature radius will immediately drop to 186m, and you’ll keep some of your momentum for a few seconds as you drop down your new top speed of 2.5km/sec, making you a lot harder to hit. If you downgrade the tech 2 shield extenders for the best tech 1 named variant, you can replace the rocket launcher with small energy neutraliser.
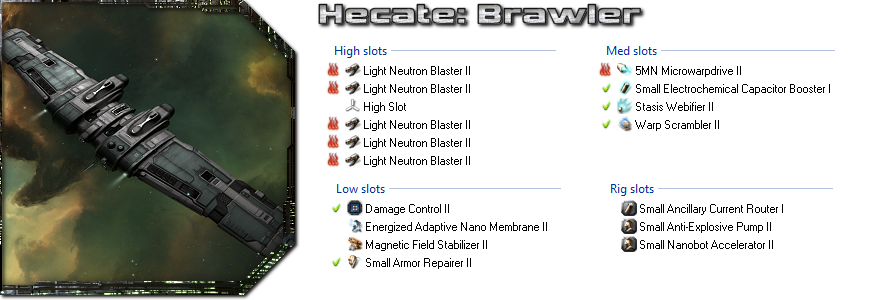 The latest of the four ships to grace us with its presence is the Gallente Hecate, which looks absolutely beautiful and fights like a brick in the face. The Hecate’s defense mode gives a unique bonus to armour repairer duration, which kind of forces it to use a non-ancillary repairer as the ancillary kind can only run for 8 cycles before stopping for a full 60 seconds to reload the nanite paste. The ship bonus also stacks multiplicitively with the Nanobot Accelerator rig’s repair speed bonus to give a huge boost to the ship’s tank, effectively turning a single armour repairer into almost two. The setup above tanks around 187 DPS until your cap charges run out, or 243 with the repairer overloaded. If you feel like splashing out, switching to a deadspace repairer for 60 million ISK will increase the tank by around 50% to 275 DPS or 356 with the repairer overloaded.
The Hecate’s propulsion mode bonus is pretty interesting too, giving a bonus to microwarpdrive speed and capacitor use. That seems to be designed to let players make shorter microwarpdrive bursts to get in range, and with no signature radius reducing ability, you’ll need to do just that. Use the microwarpdrive only for the approach to the target and turn it off as soon as you’re near the target, switching to defense mode and using the warp scrambler and web to keep the target in place.
This setup can hit nearly 3.5km/sec with a two-second align time in propulsion mode with the microwarpdrive overloaded, and it can deal 374 DPS with Null S ammo (or 430 DPS with the guns overloaded). You can technically get just over 600 DPS on paper by using Void S, but you won’t be able to actually apply much of that to any target. It’s worth mentioning that some players seem happier with 125mm railguns than blasters, as then they can switch to sharpshooter mode and snipe with Spike S ammo from 40km away. With blasters, the optimal range bonus from sharpshooter mode is basically wasted.
 The setups above are close-range brawlers designed solely to tackle targets and kick their heads in, all while taking as much of a beating as possible. They are by no means the best possible setups or the only ones that work, just a few of my favourites from those I’ve killed, been killed by, or just seen on the killboards. There’s a great deal of innovation going in the design of tech 3 destroyer fittings, and I wouldn’t be surprised to see some very clever and unexpected setups come out of nowhere to kick all of our asses.
 EVE Online expert Brendan ‘Nyphur’ Drain has been playing EVE for over a decade and writing the regular EVE Evolved column since 2008. The column covers everything from in-depth EVE guides and news breakdowns to game design discussions and opinion pieces. If there’s a topic you’d love to see covered, drop him a comment or send mail to brendan@massivelyop.com!


