

One thing I learned while at Pokemon Go’s Las Vegas Hoenn Tour and traveling in Japan recently was people still aren’t great at defending gyms, but it’s not all their fault. Not only is Niantic infamously bad at onboarding (even with its own IP), but a lot of English gym guides out there are just plain dated, if not bad too. Don’t get me wrong, some of them explain the mechanics well or have some good tips, but most feel theoretical rather than practical.
The gym meta really hasn’t changed much since the 2017 changes, so there’s no excuse for this. Yes, some people may not think much of the system, especially given that it facilitates stalking, but for those participating, using junk pokemon both threatens people’s ability to collect their daily coins and is a bit disrespectful in terms of providing poor berry feeding options.
Oddly, the best pokemon for defense at launch are the same ones at the top now, while the most common prime attacker (if you’re not using default teams), Machamp, is even more likely to be maxed out these days. With coins being arguably more valuable now that people are trying to give Niantic less money for the company’s errors, I figure we should tackle this issue. That’s why this edition of Massively on the Go is going to not only giving you some good options for your gym defenders but calling out the most popular defenders that trainers should stop using.
9/25/2023 Update: Although Timburr Community Day means a more powerful Fighting-type that’s reasonably accessible exists, we will still focus on Machamp here. Machamp may be a bit less powerful as a Fighting Pokemon, but it still has a more diverse move pool with largely more powerful attacks and counters. It also has a Shadow variant that outclasses Timburr’s final form, Conkeldurr. In that sense, while Conkl may take Machamp’s Fighting throne, Champ still has a better overall use in terms of flexibility.
Now, before we start, I want to note that to help make this guide more accessible, I’ve hidden large portions of it behind spoiler tags. If you need or want to know more, simply click to reveal them. The idea is that the base guide will be visual, short, and to the point for new or less knowledgeable players looking to hold a gym for 8+ hours worth of coins rather than make a drop-off and ignore it, but can be ramped up to a level where players can use PokeBattler’s gym simulations for themselves either to check my work or work out solutions to their local metas as the game ages. I noted that even legendaries wouldn’t do much to shake up the scene beyond giving players easier access to Legendary candy, so this guide should stay relevant for a long time.

Attacking Strategies
Click to reveal more background infoAssuming you have the basics down, we need to talk attack strategies. Many casual players don’t seem to understand that there are really two prime strategies for taking gyms. Strategy one is “Fight’em All,” from the first pokemon to the last. It’s the most common because that’s the default system the game is set up for. If someone is just using the default teams, even better, as the game has odd suggestions. Sadly, though, Machamp is both accessible and often best without its Community Day move, so any serious player who isn’t multi-accounting has no trouble harassing gyms with a top-tier pokemon.
The second strategy, however, is “One by One,” where you concentrate on taking out just the first pokemon in the gym before battling the next one. For example, if a gym has Blissey, then Chansey, then Snorlax all at full motivation, what you would do is battle Blissey, defeat it, and then decline to battle the next pokemon (Chansey in this scenario). Instead, you would simply jump back into the gym and fight Blissey again and again until it’s kicked from the gym. Then you would battle the next pokemon (Chansey) and decline to battle the next pokemon (Snorlax) until Chansey too is gone, and repeat this for each defender.
The reason to use the second strategy is to avoid defender detection. The game sends a single warning to a player when their pokemon is low on motivation. By using the “Fight’em All” strategy, there is potential to send out six warnings to six players that you’re attacking a gym. If the gym is low on motivation or filled with weak targets, this isn’t much of a problem, but if the defenders are strong, if it’s owned by a multi-accounter, or you know one of the players often uses Golden Razz Berries to restore pokemon to full motivation, you should stick with “One by One.”
Click to reveal more tips for attackers and defendersAs the defender, knowing the two previously mentioned attack styles is important in picking your defender. There are other factors to consider, and we’ll discuss them later, but I’m highlighting these strategies because they’re why other guides just aren’t helpful. One thing people often do when making gym defender lists is to look at bulk. The problem, however, is that most of those pokemon are vulnerable to Fighting types.
This makes lists that overly rely on bulk create one of the biggest realities of a poorly built gym: too much vulnerability to Fighting types. This is compounded by the fact that the default attack style for casuals is “Fight’em All.” In fact, my default gym-attack team is a Shadow Machamp with Counter, Dynamic Punch, and Rock Slide, followed by a Machamp with Counter, Dynamic Punch, and the Community Day move Payback. With these two pokemon alone, I can lazily beat most gyms with the “Fight’em All” strat.
But there’s a flip side to this: creating lists that ignore the “One by One” strategy. Instead, they create lists that acknowledge that Blissey, Chansey, and Snorlax are often the best defenders (the first two because of sheer bulk, Snorlax because it has both bulk and above-average attack), and then create lists that theoretically would protect them. For a moment, we’ll forget that these same lists somehow forget that Machamp has moves to counter their picks, but keep this in mind as it’s the reason why we’ll have a different list than many others.
Our goal for today is to not only bring up stronger defense choices, but also psychologically better defenders who have factors other lists may lack.

Defense factors
Click to reveal more background infoThe most obvious first factor is strong defensive pokemon picks. Many guides mention Blissey, Chansey, and Snorlax due to their bulk, though that’s not the only factor. The thing is, they are still the bulkiest defenders when a player is using an attacker the defender is weak to. Again, using Machamp as the most basic and accessible attacker and assuming all pokemon involved are at level 50 with their ideal movesets, Blissey lasts a full 36 seconds against ‘Champ and can kill it. Chansey lasts about 27 seconds, while Snorlax lasts about 23 seconds.
While someone can argue that, say, Dragonite can about 44 seconds against a basic Machamp, that drops to 30 seconds if Machamp has a Rock Slide as a secondary move. Even worse, Dragonite won’t even last 19 seconds against Lapras with Blizzard, a pokemon that’s been far outclassed and using the incredibly slow Blizzard as a charge move. The easily accessible Mamoswine drops that below 13 seconds. As you can see, in practical terms, Dragonite is, at best, decent against an unaware 2016 era newbie opponent. That’s not going to cut it these days, but there are other factors to consider.
How long do you suspect your gym will last before it’s attacked? A gym that’s frequently attacked will need pokemon ready to defend themselves immediately. Those are going to be ‘mon with a high CP, so the previously mentioned top three pokemon are still good in theory.
But if it’s a gym that you want to last through the night without needing to constantly feed it berries, you could use the same three pokemon listed above with lower CP or focus on pokemon that retain a lot of bulk for little CP, meaning their motivation will decay at a lower rate but still pose a threat hours later. Again, Gamepress largely has us covered. The sweet spots seem to be just below 2227CP, 1610CP, and 1281CP, depending on long you want the gym to last and how often you plan to feed.
Once you know a bit about how the mechanics work, we need to discuss gym defense psychology. This is split into three factors. The first is “Intimidation by Size.” By creating a tall gym, you create the appearance of the gym being difficult. Some players won’t even click to see what they’re up against; they’ll simply look for a short gym, which indicates lower CP defenders. This is one of the reasons many people make poor defender choices, and I would recommend against this strategy because it largely only affects the laziest players. Any reasonable player that sees, say, Tyranitar, Rhyperior, and Slaking will know the gym will be theirs in no-time flat.
That’s why the second factor, “Intimidation by Type,” is far more effective. Again, if we see Blissey, Chansey, and Snorlax, we know we’re in for a bit of a fight. However, if the other pokemon cover their weaknesses, such as with Sylveon and Florges, which are Fairy types Machamp is weak to and rarely is equipped with a counter for, there may be a hesitation to engage with that gym. Many of those pokemon can boost a gym’s height reasonably well but without bluffing the difficulty of their battle, making it largely a better strategy than Intimidation by Size.
Vaguely related to this would be theme gyms. Attackers with a heart may see the work a team put into coordinating a gym theme and let it stand a bit longer for others to enjoy. The biggest weakness to this, though, is that randoms may not participate and ruin the theme (I’m looking at you, Tyranitar and Rhyperior people who keep putting those two in when my group does an ice cream theme at the ice cream shop!). Admittedly, I have had other teams shave out pokemon that didn’t fit the theme, but don’t expect that.
Finally, there’s what I like to call “Ally Incentive.” You can include yourself for this. It’s quite simple: drop a pokemon you or your teammates are likely to want to feed berries to. It’s difficult to make a list that’ll stand the test of time, but think of pokemon you need candies for. Maybe it’s the Vivillon family, due to its 18 variants and the postcard system making demand for its candy quite high. Maybe it’s the previously mentioned Jangmo-O due to its rarity. Or maybe you somehow live in an area that’s Rhydon-poor and locals really need that candy. The idea is to drop off whatever pokemon motivates people to feed berries to order to get other players to place strong defenders and frequently check the gym to feed berries.
I know this may confuse some people, so quick anecdote. As some people know, I had major Pokemon GO stalking issues for well over a year. Briefly speaking, gyms would fall in minutes or hours as I was physically or virtually followed, depending on the location and stalking group (there were multiple).
The only thing that would make my gyms last hours or even overnight was if I found a decently built gym and placed the previously mentioned Jangmo-O. Being a new and rare pokemon even now, people in the gym would actually berry defense, not to help me as a stalking victim (if they knew) but out of their own candy-greed. On a less dramatic note, I did the same thing with some of the more remote gyms at the Vegas Hoenn Tour with similar results: Despite people not often going to the far-off gyms, other people were feeding little Jang and the rest of the gym for about half of the event. It’s not something many players consider, but it’s also because many players forget they can get berries from feeding, so this works best with a more informed community which, again, should include yourself.
Now that we’ve got our defense strategy outlined, let’s go over the pokemon that are better kept out of the gyms.
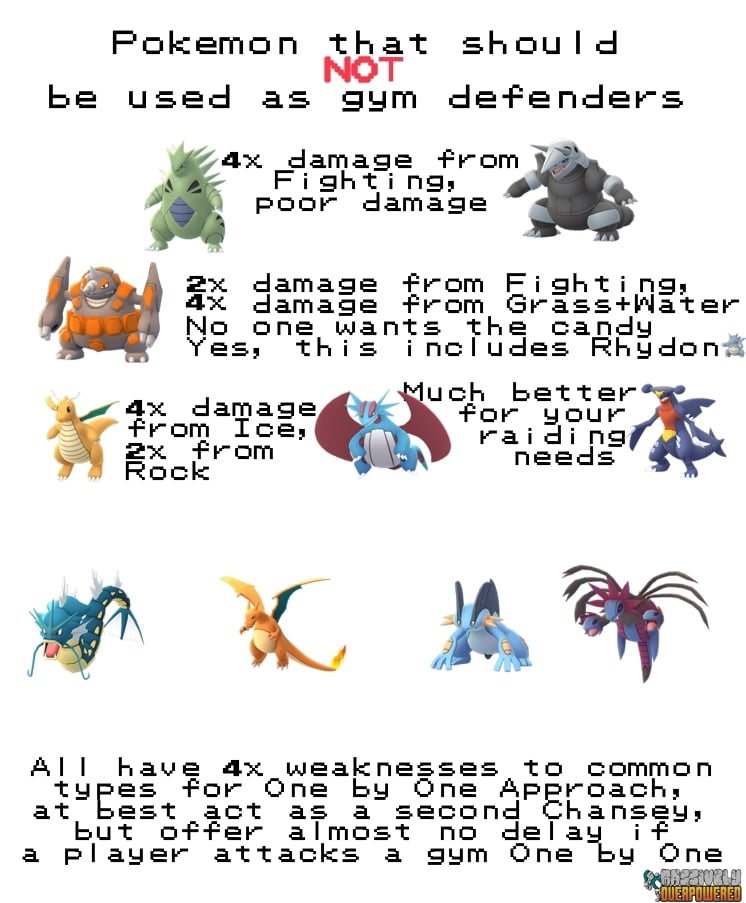
The rejects
Remember how I said many lists focus on defending gyms from Fighting-types and the “Fight’em All” approach? The most glaring weakness of those lists is including pokemon with a 4x weakness. It would be one thing if it were pokemon like Exeggcuter, which takes quad-damage from the horribly underused Bug-types most players still lack even after the first Elite Raids, so that would be more forgivable. But Dragonite, which is 4x weak to Ice, which is very useful against legendary pokemon that also have that weakness? Or Gyarados, which is 4x weak to the series’ mascot, Pikachu? Again, largely no reason to risk using these pokemon.
Part of these “errors” are most likely because the meta is largely focused on being weak to Fighting. That makes Fighting counters like Flying, Psychic, and Fairy more appealing than anything that’s weak to Fighting. Unfortunately for those who write those guides, the highly accessible Machamp can counter all of those types but is largely built for either Flying or Psychic countermeasures. It’s an oversight, but a glaring one, especially at this point in the game’s life.
Going back to Dragonite, yes, taking about 30 seconds to be beaten by Machamp sounds good in a vacuum with the “Fight’em All” approach, but having Dragonite lose in under 12 seconds to Mamoswine is embarrassing. Hypno (which didn’t even make our list) has far lower CP, but it lasts longer not only against Machamp by a full second and lasts 3 seconds longer against its most common counter, Gengar. Not only that, but the lower max CP also means it will last longer and stay stronger in gyms compared to the Dragon.
That may not sound like much if you’re simply dropping pokemon off in a rural area you’re not worried about being attacked, and that’s fair. In fact, Gamepress has one of the more detailed lists on complex gym situations, but it too ignores the One by One method and mostly seems theoretical (though the author places it up there with Blissey, I’ve never struggled with Mandibuzz despite some locals trying to apply the guide’s suggestions, and my casual friend didn’t even realize it was supposed to be good when she took one out without a care).
Gamepress’ tier list does explain some lesser explored ideas, but when you’re defending a gym during an event, in a city, or just have someone picking on you, you need something less theoretical and more practical. That extra time from using something with bulk can make or break the odds that you or someone else in that gym can berry up and ensure that you get your daily coins/keep the gym.
The most practical picks
To note, the pokemon above were chosen not just based on my personal/locals’ experience playing in cities, suburbs, hiking trails, and a major Niantic event, nor just on the previously mentioned Silph Road bulk list; they were also tested out on Pokebattler’s gym simulator against a level 50 Machamp as a level 50 themselves to show best case scenarios for both attacker and defender. For simplicity, feel free to ignore the bottom two tiers, as they have some very specific uses.
Click to reveal more methodology tipsThe idea was to not only find something that could slow down Machamps when a player uses the “Fight’em All” method, but something that can at least leave an attacker with a few bruises when the “One by One” method is used. Time to win was judged between only statistically perfect pokemon, with the high end (slowest) being Machamp vs. Blissey both being at level 50 and taking about 35 seconds, and a “practical but bad” defense with a level 30 Jolteon vs level 50 Gyarados ending in only about 15 seconds. These two were chosen because Gyarados is easy enough to have maxed out one these days as a veteran player, is one of the common “mistake” defenders I’ve noted, and new players can easily access a level 30 Jolteon either by themselves due to the ease to achieve that level and how common Eevees are.
From there, I went through various other tier lists (not just for gyms, but bulk and overall stat products). The chosen pokemon aren’t in order or power within their tiers, simply in relation to their ability to combat the particularly the accessible Machamp vs. an equally accessible counter to their typing. Emphasis is primarily on imminent gyms attacks where you’ll need to use a Golden Razz Berry to refill defenders’ motivation, but I’ll also note when a pokemon’s max CP is low enough that it can remain a threat for longer periods of time.
I’d also like to note that, while many guides may encourage “recycling” pokemon as both attacker and defender, I recommend not doing this: your best attackers should be available to you at all times. Putting a strong attacker in a gym that may suddenly no longer be attacked or bug out deprives you of a tool for raids, Rockets, gym attacking, and possibly even PvP. Much as with raids, start out just by getting pokemon with the desired CP, but eventually start building defenders.
As some people may have guessed, gym defense does have meta-aspects. I’m acknowledging things like gyms in areas with poor reception, dropping off when servers are bad, or just knowing that gyms far from parking areas have a better chance to survive than those accessible by car. Not much can be done about that aside from acknowledging the issue. However, Golden Berries greatly extend a gym’s longevity, so even if you have a bad defender, frequent Golden Berries while being attacked may discourage some attackers.
But at the end of the day, if people are attacking and they want it bad enough, there’s a good chance they’ll get it. We just need properly built pokemon to help remove that desire, so below, I’ll briefly address each pokemon on the list, its approximate survival time in combat at full motivation, move picks, and add some additional notes under the spoilers.
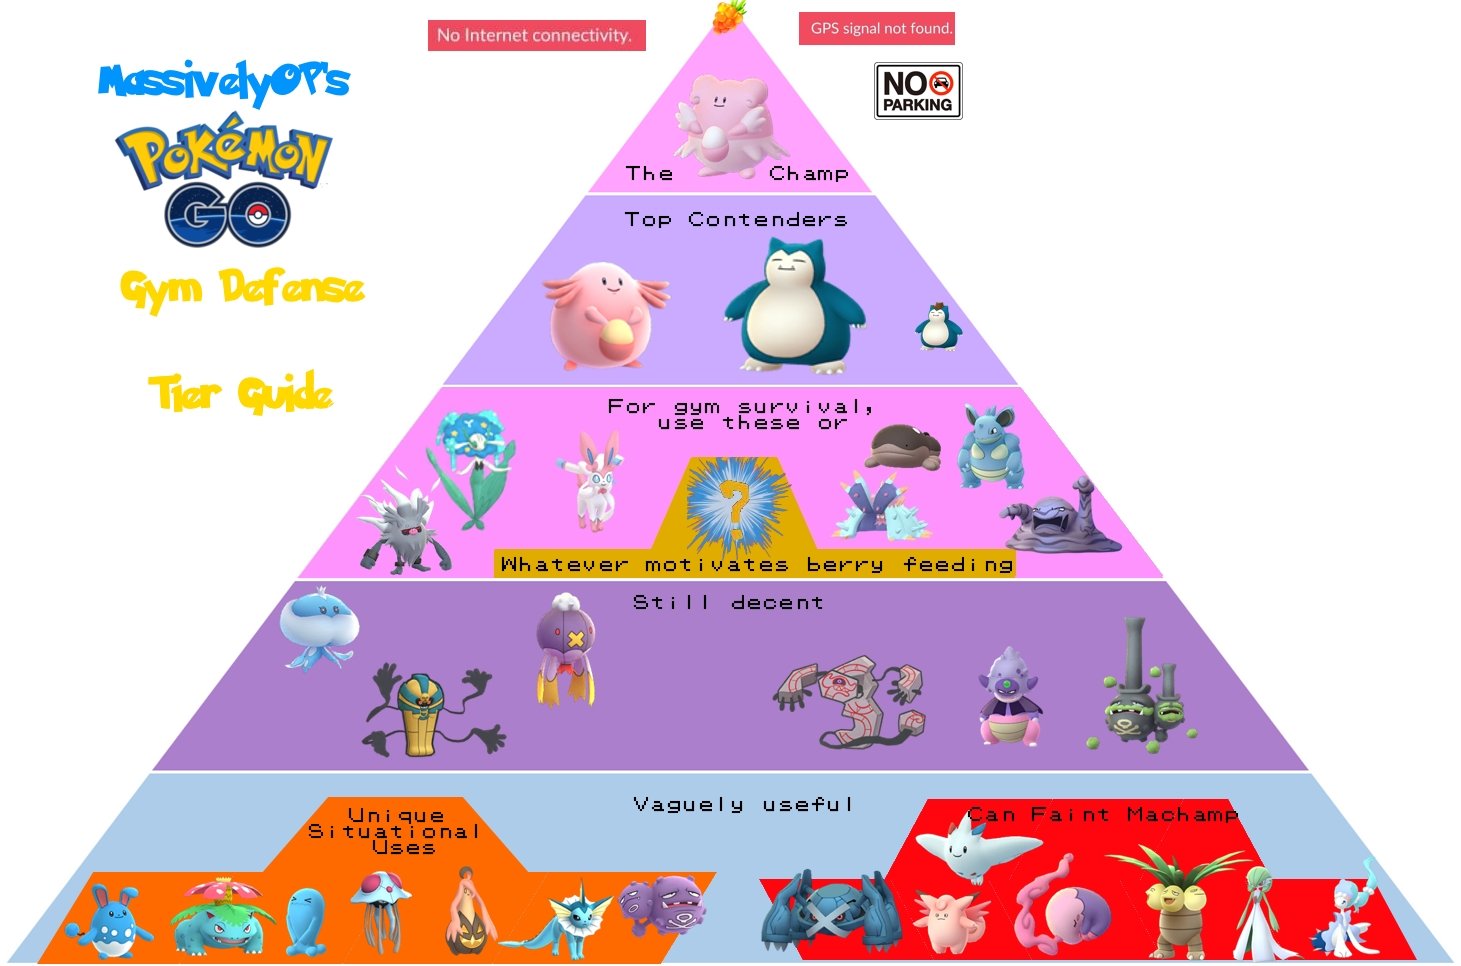
The top three
Now, these three shouldn’t surprise anyone, but as a reminder, you do not want them back to back. For example, if you see Blissey in the first gym slot when choosing a fellow defender, choose a pokemon from the lower three levels of our pyramid, meaning don’t do Blissey-Chansey-Snorlax but rather do Blissey-Florges-Chansey. This helps slow down “Fight’em All” players by quite a lot, while also leveraging some psychological intimidation, and I say that as someone who uses the “One by One” method.
Blissey: ~36 seconds to lose to Machamp (can faint it). Use Zen Headbutt and Psychic or Dazzling Gleam
Click to reveal more Blissey tipsWhile people will often say you should use Azumaril and other pokemon that cap out with a low CP for long term gym defense, Blissey has the most psychological advantage against players. I actually have a few below 1000CP simply because if people see a Blissey at full motivation, they often won’t even notice the CP and leave the gym alone. Any time you really want to keep a gym, just choose Blissey.
Chansey: ~27 seconds to lose to Machamp. Use Zen Headbutt and Psychic or Dazzling Gleam. Best in last position when featured in raids.
Click to reveal more Chansey tipsUnlike Blissey, though, Chansey is occasionally a raid boss. Putting Chansey in the last slot can camouflage your gym, making it seem like a raid is active to players who aren’t paying attention. If people are looking for Chansey, this can have the opposite effect of attracting attention, so your mileage will vary based on your local players.
Snorlax: ~23 seconds to lose to Machamp. Use Zen Headbutt and Body Slam, Return, or Outrage. Best in last position when featured in raids.
Click to reveal more Snorlax tipsFor me, the inclusion of Snorlax is often a hit or miss. Too many people drop off pokemon that are vulnerable to Fighting. If there’s a single Rhydon-family member, Tyranitar, Aggron, or just plain bad pick like Pikachu, and Chansey and Blissey are already in, I’ll avoid placing Snorlax altogether. Again, many people’s default attack style is Attack’em All, and stacking the same weakness only makes their job easier. Pick Snorlax on a case-by-case basis.

Survivalists
Snorlax is basically barely part of top three based on theoretics. In practice though, most gyms are poorly built and often quite vulnerable to Fighting-types Snorlax is weak to, requiring those who wish to keep a gym to pick more diverse pokemon. If you have Blissey and Chansey in the gym, that’s going to help, but (outside of theme gyms) you’ll want something between them to really make your gym work. That’s where this tier comes into play.
Florges: ~44 seconds to lose to Machamp (can faint it), 19 seconds for Metagross. Use Fairy Wind and Psychic. Best placed between tier 1 or 2 pokemon.
Click to reveal more Florges tipsThe temptation to use the spammier Disarming Voice is high, but Psychic comes out faster and won’t be resisted if someone tries to “counter” Florges with Charizard. Florges won’t win that fight, but it will take Charizard about 32 seconds to win and most likely leave it in a weakened state, plus it protects Florges from one of its real weaknesses, Poison. It also may throw the attacker off, leaving them to google the pokemon to find a counter. It’s a one-time trick for the most part, but even then, it’ll require attackers to stop and think for a bit until/unless they grow accustomed to seeing it in gyms.
And that’s also a bit of its disadvantage. Outside of events, Florges is rare and a bit difficult to evolve, requiring 20 hearts plus 100 candy. Admittedly even I don’t have one maxed out, but I’ve used a few high CP ones to train locals to watch out, then toss in CP 1000 ones as a fake out in remote areas people often won’t have a lot of time to battle at. The combination often makes the gym I use them at get skipped over for a while.
Sylveon: ~43 seconds to lose to Machamp (can faint it), 20 seconds for Metagross. Use Charm and Psyshock or Dazzling Gleam. Best placed between tier 1 or 2 pokemon.
Click to reveal more Sylveon tipsIf you thought Florges was a pain to evolve, it gets even worse with Sylveon, requiring 70 hearts outside of events to evolve from Eevee. Its best defensive move, Psyshock, is also a Community Day move. Dazzling Gleam is almost as good for Machamp, and still faints it at full motivation, but also leaves Sylveon with only Fairy moves. Last Resort is technically an option but seeing as Steel types resist that too, it’s really a far cry from Psyshock.
11/3/2023 Update for Clodsire: ~45-48 seconds to lose to Machamp, ~19 seconds for Mamoswine. Use Mud-Shot and Sludge Bomb for damage or Acid Spray for survival. Best placed between tier 1 or 2 pokemon.
Click to reveal more Clodsire tips1/22/2024 Update for Annihilape : ~56 seconds to lose to Machamp (can faint it), ~18 seconds for Espeon. Use Counter and Shadow Ball. Best placed between tier 1 or 2 pokemon.
Click to reveal more Annihilape tipsRemember, though, that few people have level 50 Mewtwos, and I’d wager Psychic types in general, as it’s a fairly weak raiding type. Anni is also from the fairly common Mankey line, so ya’ll are probably swimming in candy and can invest in this beast if you can evolve one (preferably with a friend’s help or fighting Master League level Blanche). And while I encourage most people to have dedicated defenders, Anni isn’t great for raid attacking, but it can flexibly use the same defense moves in League play, so you could potentially use your PvP monkey for defense when its League is out of rotation. The biggest downside is that, like many other curveball defenders, it’s weak to Psychic. Yes, Ghost to, but Ghosts are weak to themselves so the attacker is at least at a partial disadvantage. Keep that Psychic weakness in mind when dropping it into your local gyms!

Whatever Motivates Berry Feeding: There’s no easy way to break this one down, but this is perhaps one of the most fun and rewarding gym defender options. This goes back to the “Ally Incentive” strategy I discussed above, where you drop in a pokemon based on getting people to watch the gym and feed berries instead of considering the ‘mon’s mechanical defenses. Need Vivillon candy? Drop one in. Playing with friends who have tons of berries but need rattata candy? Drop one in. You can debate CP and motivational decay until you’re blue in the face, but a gym that’s constantly watched and fed is an attacker’s worst nightmare and your berry-hoarding allies’ best friend.
It may sound odd, and does require you to know your local community’s wants, but with the right choice and community, candy motivation can turn a so-so built gym into something that’s nearly always topped off. That can really discourage gyms attacks, and I’m speaking from experience here.
Click to reveal even more Berry Feeding Motivation tipsRegionals: Heracross is a good one since, despite having a quad-weakness, has a useful upcoming Mega. Kangaskan is a fan favorite and currently has a Mega, though is less than useful. Mr. Mime, Farfetch’d, and Tauros all have regionals with varying use.
Rare Dragon-types: Whatever dragon you’re not getting a lot of is what you wanna drop in.
Ultra-rare hatches: Larvesta is a big one, costing 400 candy for a pokemon that released as outclassed and far too rare to be practically used by 99.9% of the player base, both in terms of function and accessibility. Salandit is another, being not so useful but being rare, requiring the even rarer female, and only hatching from 12k eggs.
Toxapex: ~40 seconds to lose to Machamp, 16 seconds for Espeon. Use Bite and Brine. Best placed between tier 1 or 2 pokemon.
Click to reveal more Toxapex tipsOf course, the other side of the coin is someone like me, who has multiple perfects. In that situation, well, most things are going down anyway. But again, this guide isn’t going to be able to perfectly address all attack styles but rather guard against the main ones. Toxapex doesn’t take quad damage from anything for the One by One crowd, and the Fight’em All players are going to be in for a slog. Being Poison also means that it creates a lesser chance of people having counters built into their main gym team, as even if they do switch, most of us anticipate the need to counter Normal types, Fairies, Dragons, and some Flyers. Poison shares no weaknesses with those types.
Toxapex provides a solid wall against Machamp. Lucario with a Steel move for Fairy defenders only deals neutral damage to Toxapex, and for the spicy/lucky attackers, Toxapex can take nearly half of Terrakion’s health down in simulations. That matters since Toxapex’s CP caps out below the 2000 CP mark, meaning it can last quite a while in gyms.
Muk: ~40 seconds to lose to Machamp, 15 seconds for Espeon. Use Lick and Thunder Punch or Return. Best placed between tier 1 or 2 pokemon. Best in last position when featured in raids.
Click to reveal more Muk tipsMuk won’t get any kills (Return trades 2 seconds of survival for a lot more damage against Machamp in simulations), but it’s got a spammy moveset that can make some players nervous, especially if placed between sturdier or harder hitters against opponents using the Fight’em All strategy. I’ll fight a Wobbuffet with my Machamp if I know the defenders are lazy, but I’ve had enough bad experiences with well-fed Muks to know I need to be careful.
Finally, there’s putting it in last slot to trick unobservant players into thinking your gym is a Muk raid. No one really wants Muk, so unlike Snorlax, the chances of that move backfiring on your is minimal. This makes Muk a sturdy gym defender capable of various kinds of intimidation and mind games that could dissuade
Nidoqueen: ~38 seconds to lose to Machamp, 22 seconds for Vaporeon. Use Bite and Earth Power. Best placed between tier 1 or 2 pokemon. Best in last position when featured in raids.
Click to reveal more Nidoqueen tipsAs with Muk, you want to avoid STAB attacks because Nidoqueen’s really not going to be fainting anything in most situations, but it can tear a chunk out of a ‘mon when properly placed. Also like Muk, Nidoqueen is occasionally a raid boss, and one no one really wants it, which once again means its bulky and capable of mind games that can deter attackers from even checking the gym out. Just watch out if you’ve got lots of ‘mon weak to Ice and/or Water in the gym already.

The other gap fillers
In most ideal situations, the above three tiers are the only ones you need. Something like Blissey-Florges-Chansey-Sylveon-Snorlax-Muk would make it so the gyms looks like a Muk raid lazy players won’t even click – it’s too high for lazy attackers to want to mess with, too tough for the Fight’em All attackers, and too annoying for the One by One attackers.
But that’s ideal. If you’re at a popular spot in town right before the Wednesday Raid Hour and trying to get some pokemon locked into gyms so you’ll be safe and get an hour’s worth of coins, you’re probably dealing with gyms full of Rhydons and Pikachus. Gross. You may need some additional curve balls to help reset the balance of some gyms.
Jellicent: ~39 seconds to lose to Machamp, 16 seconds for Gengar. Use Hex and Ice Beam or Shadow Ball. Best placed between tier 1 or 2 pokemon.
Click to reveal more Jellicent tipsThat’s where Ice Beam can come into play, oddly. Ice Beam is the hardest move to dodge out of Jellicent’s arsenal. It does less damage to Machamp than Shadow Ball in theory, but it may have a better chance to hit in practice. But if someone is doing the One by One Method, they may use a Dark, Ghost, Grass, or Electric type pokemon to counter Jelli. There’s nothing to be done about Electric, so let’s ignore that. Ghost is good against Ghost but is also resisted by Dark. Ice, though, works against Grass and isn’t resisted by any of Jelli’s traditional counters. Again, either kit will work, so next time there are too many Ice-vulnerable ‘mon in a gym you’re dropping off at, consider putting in some Jelli.
Cofagrigus: ~39 seconds to lose to Machamp, 15 seconds for Gengar. Use Zen Headbutt and Psychic. Best placed between tier 1 or 2 pokemon.
Click to reveal more Cofagrigus tipsAdmittedly, it leaves Cof very weak to Dark-type attackers, but that’s why you may want to drop it into a gym that’s maybe overstacked with Fairy types or things weak to Grass, as many Grass attackers are part Poison and thus will take extra damage from a Psychic Cofagrigus.
It also works quite well to “fix” gyms with stacked weaknesses. As you’ll see further down the list, the meta generally involves pokemon weak to Fighting, Grass, Ground, Ice, Rock, Steel, and/or Water attacks. Cofa here is weak to none of those. We do have multiple Ghosts that can potentially get us in trouble, but Cofa can add variety when smartly deployed.
Drifblim: ~38 seconds to lose to Machamp, 16 seconds for Gengar. Best placed between tier 1 or 2 pokemon. Best in last position when featured in raids.
Click to reveal more Drifblim tipsThe fact that both these moves are SE against Drify is a bad sign, made worse by the fact that Drify is also weak to Ice types, a typing that works wonders against basically the rest of the Do-Not gym list. It may be hefty, but if you see other Flying-types in the gym, or anything weak to Electric, Rock, Ice, or Dark-types, maybe consider using something else. Unless you’re dropping off in the last slot when Driflbim can be a raid boss. Then you at least have a potential psychological advantage.
Runerigus– ~38 seconds to lose to Machamp, 16 seconds for Gengar. Use Shadow Claw and Shadow Ball. Best placed between tier 1 or 2 pokemon.
Click to reveal more Runerigus tipsIt’s Ghost typing helps a bit against Machamp’s fast attacks, but just like Drify above, remember that ‘Champ has the tools to Super-Effective it. Worse, it’s part Ground. That makes it vulnerable to Ice, Grass, and Water, all of which are popular attacking types against that Do-Not-Put-Into-Gyms list.
That being said, Runey is also fairly rare. It’s most commonly caught during October, which means players (especially newer ones who know about candy feeding) may be more willing to feed it to keep it alive.
Galarian Slowking: ~40 seconds to lose to Machamp (can faint it), ~16 seconds to lose to Gengar. Use Confusion and Shadow Ball or Surf.
Click to reveal more Galarian Slowking tipsWhat’s more interesting is that Galarian Slowking is weirdly the best of them. It lasts the longest against Machamp and is quite flexible with both its fast moves as well. Hex and Shadow Ball give you a few extra seconds against Gengar and other Ghosts that might be used as a counter, while Hex and Surf is good against most Ground types. Maybe someone out there thinks Togekiss can do better, but recall that Machamp learns Rock Slide, a 2-bar attack. Toge won’t last as long in a direct fight in the short term, and the Slow-family’s lower CP means they stay stronger longer.
The problem is that you can’t use multiple varieties. You can have a Slowking and a Slowbro, but you can’t have Kanto Slowking with Galarian Slowking. The game doesn’t allow it. Honestly, the only reason it’s not ranked up with Nidoqueen is because Gengar is much easier to build and kit out as a Slow-counter than some other water options many players would use against Nidoqueen, like the 400-candy Gyarados working best with its Community Day move Aqua Tail.
It also works as a sort of counter-counter. As a Poison/Psychic type, Slowking takes neutral damage from Psychic attacks. Alone, Slowking isn’t a bad choice at all, but if there’s a lot of Poison types in the gym, Slowking can fit the theme while also being able to handle Psychic or Ground types that would counter them, depending on its build.
Galarian Weezing– ~38 seconds to lose to Machamp, 15 seconds for Metagross. Use Fairy Wind and Play Rough. Best placed between tier 1 or 2 pokemon. Best in last position when featured in raids.
Click to reveal more Galarian Weezing tipsThat being said, it’s not a common defender. Newer players may be unfamiliar with its typing and not bring the right counter. It’s also sometimes a raid boss, so putting it in the final position may dissuade some players from even checking the gym. Nice!

Vaguely useful
This is where some long-time players and even guide makers may see some more familiar faces. These pokemon very much have been left behind on their own but serve very specific purposes in filling gaps. The game in many ways has moved past them. For example, there are few reasons to use Gardevoir when Florges does almost everything it does but is less familiar/predictable for casuals, lasts longer on average against popular Machamp builds, and will most likely attract more berry feeding. Gardevoir is also better to build for actual raid use.
That being said, Gardevoir and others on this list can still be confidently used in gym defense under certain conditions, especially since most of these are also more accessible to casual players. When possible, you probably don’t want more than one of this tier in your gym, if that.
Azumarill– ~35 seconds to lose to Machamp, ~18 seconds for Venusaur. Use . Best placed between tier 1 or 2 pokemon. Best in last position when featured in raids.
Click to reveal more Azumarill tipsThe one nice thing is that nearly all of its moves are valid. Bubble gives STAB damage while Rock Smash helps against some lazy auto-picks from the game. Play Rough deals Super Effective damage to Machamp, Ice Beam hits Venu and the Grasses, and Hydro Pump (while slow to build) is a difficult-to-dodge, high-damage attack. I don’t really recommend using Azumarill compared to some of the other options here, especially since it’s not new and has been featured in many events by now, but you can recycle old PvP-built Azumarills as Defenders if you find a better one to use in League PvP play.
Primarina: ~36 seconds to lose to Machamp, 18 seconds for Venusaur. Use Charm and Psychic.
Click to reveal more Primarina tipsYou can possibly make Prima last 2 seconds longer by using its newest move, Disarming Voice, but the trade-off is that many popular Grass types are also Poisons, which resist Fairy types. DV doesn’t extend Prima’s lifespan against most Grasses, but it also doesn’t really lose much time in theory either. I don’t normally say this, but this may be one of the few times you want two moves on your defender to keep the other team off balance. However, as many “don’t bring” pokemon take quad damage to Grass, you need to be careful in deploying Prima, as you could accidentally over-stack Grass weaknesses. I’d wager one move is fine for most players outside of cities/competitive gym areas.
Finally, keep in mind that Primarina will eventually get a Community Day move, at which point you’ll probably want to use it in raids as a Water attacker. Since it’s gotten a few events now, and will get that CD in the future, my advice is to simply evolve a Primarina into the CP range you want, rather than finding one with good stats to raise. It’s a big part of the reason I’ve put it under Azumarill here.
Venusaur: ~36 seconds to lose to Machamp, 18 seconds for Charizard. Use Razor Leaf and Frenzy Plant. Best placed between tier 1 or 2 pokemon. Best in last position when featured in raids.
Click to reveal more Venusaur tipsBasically, Venusaur, like the two above it, must be carefully deployed to get value as a defender. It’s another oldie that also won’t encourage a lot of berry feeding, and you probably have at least one you may use as a Mega. However, as better Grass options for raid attackers are plentiful, you could use old Venusaurs that get raid benched as new gym defenders. Bonus points if you unlocked a second attack, especially Sludge Bomb or Return for neutral damage against some popular attackers. Japanese players seem to know it’s still useful, as I’d often see this one in major city gyms.
Wobbuffet: ~38 seconds to lose to Machamp, 18 seconds for Gengar. Use Charm and Mirror Coat. Best placed between tier 1 or 2 pokemon. Best in last position when featured in raids.
Click to reveal more Wobbufett tipsI will admit that Wobbu has the psychological advantage for most players and will slow down your average player more. That being said, I’m personally more cautious of Hypno when attacking because I know it has a diverse moveset and I’m willing to dodge more often during the first fight just so I know what to watch out for the next time, so Hypno also has that going for it. The only reason Wobbu is here and Hypno isn’t is that Wobbu is easier to use and deploy, while Hypno will give only gym veterans like myself pause, and we’re a rare breed indeed.
Tentacruel– ~37 seconds to lose to Machamp, 15 seconds for Espeon. Use Acide for its Fast Move. Best placed between tier 1 or 2 pokemon. Best in last position when featured in raids.
Click to reveal more Tentacruel tipsThere is one other nice factor though: No one wants to raid Tentacruel. It’s generally seen as a useless Gen 1 pokemon. While no one may feed it, during Tentacruel raid rotations, not many people are going to click the gym either, to the point where I’ve missed dropping off pokemon on my own team until my coin-hungry Valor friend noted there was space for me. It’s a two-edged sword, but at least if you’re a fan of the pokemon, like Niantic CEO John Hanke, it’s good to know this ‘mon can be a bit of a monster.
Gardevoir– ~36 seconds to lose to Machamp, 14 seconds for Metagross. Use Charm or Confusion and Dazzling Gleam, Synchronoise, or Psychic. Best placed between tier 1 or 2 pokemon. Best in last position when featured in raids.
Click to reveal more Gardevoir tipsThis matters if you’re going up against rural players who don’t have good access to revives and potions. In fact, Gardevoir was one of the reasons I created five tiers to discuss. Bulk means a lot when you’re trying to keep a gym up for a few minutes or in a rural area you plan on berry defending. However, your local meta may involve picks that run down the attacker’s supplies. I wouldn’t use Gardevoir myself at, say, a Go Fest, but there are a few gyms on hiking trails I’d drop her at when fighting spoofers who tend to easily give up (yes, my local area has those).
As Metagross is one of the stronger Gard-counters, you may want to have your defense Gard have two Charge moves unlocked, with Shadow Ball being one to deal Super Effective damage. However, it’s also a big investment for a pokemon that does see some raid use, which is why I would hesitate to go overboard here. Building a Florges is a bit more difficult, but just using a high CP one out of the box is doable, if time-consuming, but will also get fed more than ol’ Gardevoir.
Exeggcutor– ~34 seconds to lose to Machamp, 16 seconds for Gengar. Use Confusion and Psychic or Zen Headbutt (legacy move). Best placed between tier 1 or 2 pokemon. Best in last position when featured in raids.
Click to reveal more Exeggcutor tipsIt can also help fix some gym weaknesses. Fighting, Water, Grass, and Ground are often common weaknesses, even among pokemon on this list. Exeggcutor is resistant to all of those, with Ice being the only common gym-weakness you need to worry about. Again, that quad-Bug weakness does exist though, and while it can deal damage and tank well enough against Fighters and some neutral attackers, it can be almost as risky as using some of the “Don’t Use” tier ‘mon against a smart player. That being said, I often saw Eggy here in busy Japanese gyms when Venu wasn’t present.
Musharna– ~36 seconds to lose to Machamp, 16 seconds for Gengar. Use Zen Headbutt and Dazzling Gleam, but Zen Headbutt and Psyshock are OK. Best placed between tier 1 or 2 pokemon.
Click to reveal more Musharna tipsGourgeist (small+)- ~35 seconds to lose to Machamp, 16 seconds for Charizard. Use Hex and Shadow Ball. Best placed between tier 1 or 2 pokemon. Best in last position when featured in raids.
Click to reveal more Gourgeist tipsGourgeist is no different from most of these, except its Ghost typing makes it more resilient to Fighting types that have to blow their Charge moves on it. Its staying power also varies on the size, as the bigger it is (with XXL being the best) the longer it’ll last. The downside, of course, is that it basically only spawns in October events, plus Ghost means dealing with some other heavy hitters. Again, being on this list does mean a pokemon has value, and Gourgy is a curve ball, but try to stick to the higher tiers where able.
Togekiss -~33 seconds to lose to Machamp, 17 seconds for Metagross. Use Charm or certain Hidden Powers and Dazzling Gleam, possibly with a second Charge move. Best placed between tier 1 or 2 pokemon. Best in last position when featured in raids.
Click to reveal more Togekiss tipsAua Sphere, its Community Day move, can help against Rock and Steels, but the most popular Steels and Metagross (which will take neutral damage here) and Melmetal, so it’s usefulness feels questionable at best, unless someone uses Tyranitar. It’s a bad move, as it’ll already take Super Effective damage from Fairy types, so the quad-damage from Fighting relies on someone being very lazy/unaware and the auto-team-picker being very bad.
That being said, a second move that involves Flamethrower can help Kiss take a chunk out of both Steel and Ice attackers. Again, your pokemon will randomly pick between the two, but it’s good for throwing the attacker off. Kiss having access to Hidden Power can do the same. It’s very much a downgrade from Charm, but if you want something tricky, Fire works against the above mentioned Ice and Steels, but Hidden Power Psychic still hurts Machamp and can hurt a Poison attacker if someone tries to get cute. Again though, that’s some major meta-planning, so for the most part, just stick to Charm and Dazzling Gleam.
Clefable (double fairy)- ~36 seconds to lose to Machamp, 14 seconds for Metagross. Use Charm and Dazzling Gleam. Best placed between tier 1 or 2 pokemon. Best in last position when featured in raids.
Click to reveal more Clefable tipsClefable isn’t super flexible about its moves, though. Fairy Wind and Zen Headbutt will take away its ability to faint Machamp, and nothing really can be done about a Metagross counter. Clefable’s basically a one-trick pony, but one most lazy players will overlook, thinking it’s low CP won’t be a problem for their Machamp. It will be, if they’re not careful. And again, as a raid boss no one wants, you may be able to completely avoid detection if you drop it off in the last gym slot.
Vaporeon– ~30 seconds to lose to Machamp, 23 seconds for Venusaur. Use Water Gun and Aqua Tail, Water Pulse, Liquidation, Scald, and/or Last Resort. Best placed between tier 1 or 2 pokemon. Best in last position when featured in raids.
Click to reveal more Vaporeon tipsThe problem, though, is that it’s still weak to Grass, with not much of a solution. Against Machamp, Last Resort theoretically helps Vap last longer against Machamp than its Water moves, and it does neutral damage to its Grassy counters in most situations. However, against the Steels you may be worried about, Last Resort gets resisted. This is another of those situations you could use a retired PvP pokemon with two moves as a defender, but generally I use Jellicent before Vaps, as it’s far stronger against Fight’em All attackers.
Weezing– ~31 seconds to lose to Machamp, 21 seconds for Vaporeon. Use Infestation and Shadow Ball. Best placed between tier 1 or 2 pokemon. Best in last position when featured in raids.
Click to reveal more Weezing tipsNow, again, all those players stacking bad Rock defenders are a problem, as Weezing and all those picks are weak to Ground. However, if there’s a gym with smarter players and a few weak Fairies, this Weezing can throw a neat curveball.
While you could use Acid and Sludge Bomb to hurt Machamp more, Infestation and Shadow Ball theoretically make Weezing last longer against Champ. It also deals more damage to Metagross and even Mewtwo. As a very uncommon defender, few players will see this coming, and if they attack while Weezing is at full power, they may spend more time dodging than attacking, potentially buying you and other gym-mates time to berry up.
That’s very specific, but Weezing, like the Galarian one, also is a raid boss, and unlike the Galarian one, isn’t popular, so you have an increased chance of people failing to click the gym to attack it. Sometimes being full of hot (poisonous) air isn’t so bad after all!
Metagross -~30 seconds to lose to Machamp, 19 seconds for Charizard. Use Zen Headbutt and Psychic. Best placed between tier 1 or 2 pokemon. Best in last position when featured in raids.
Click to reveal more Metagross tipsThis is also why Charizard is used as the potential counter, as a smart player will play it safe to take neutral damage against Gross. Even then, 19 seconds isn’t bad, especially when you recall that gyms may have Steel-stacked weaknesses, by either lazy players or even smarter ones, including those who may use this guide without reading the notes.
While Metagross can be a raid boss, it can be a popular one depending on if its Community Day move is available, so it’s a bit of a toss up on using it in the last slot. While it may be technically be part of the bottom tier, like Vaporeon, it can help fix a gym’s weaknesses when correctly delpoyed.
Hopefully this guide has helped give both new and returning players some ideas on how to spice up their local scenes, or at least get a wider view of the gym defense meta. While it’ll be updated if we see any major shakeups, but I suspect gyms would need a major overhaul before any new Pokemon really shakes-up this tier list, especially in terms of what not to bring.
 Massively OP’s Andrew Ross is an admitted Pokemon geek and expert ARG-watcher. Nobody knows Niantic and Nintendo like he does! His Massively on the Go column covers Pokemon Go as well as other mobile MMOs and augmented reality titles!


