

Judgment is upon us, friends, in this edition of the Flameseeker Chronicles: The fourth and final chapter of Guild Wars 2’s The Icebrood Saga: Champions drops today! Eighteen months of living, breathing content culminates in a whirlwind of a world boss encounter – Dragonstorm – and one of the highest stakes showdowns we’ve seen in Guild Wars 2. I hope you’re ready for an engaging, pacey, and coordinated clash of cataclysmic proportions in this finale!
With so much ground to cover to wrap up this Saga, my fellow MOP columnist and Colin and I have split this task into two parts. I’ll discuss the new world boss and its mechanics today in a fairly spoiler-free rundown of the encounter, while Colin will bring you a fantastic story synopsis with a deep dive postmortem of the Icebrood Saga next week once we’ve all had the chance to experience it. Between both pieces, you’ll understand the current state of play in Tyria and will be in a good position to tackle the aftermath.
I played through the boss encounter with the episode designers to get a feel for its mechanics before today’s launch. Fair warning: This one is a bookmark-and-revisit article for those of you who aren’t up to date with the Icebrood Saga and don’t want any spoilers for its conclusion. While I’ll not be revealing the outcome of this encounter or spoiling the fates of those involved, proceed with caution if you want a fresh playthrough without knowing what you’re up against beforehand.
The story so far
Honestly, there are only a few threads you need to keep track of for the finale to make some sense to you, so I’ll not wax lyrical here. The main thing to note is that each of the two active dragons, Primordus and Jormag, has empowered a champion and is ready for a rather evenly matched clash for power over Tyria. The two dragons have used the ambitions, insecurities, and power of our beloved but headstrong ally Braham and the charismatic but increasingly desperate Ryland to coerce them both into the role.
Braham becomes the leading champion of Primordus in his blind fury against Jormag and to bring a power equal to her into the feud against the ice dragon in a story arc that has been building since his late mother’s passing and was set in prophecy once his arrow pierced Jormag’s fang. Likewise, Rytlock’s son Ryland champions Jormag in an attempt to hold as much power in Tyria as the commander with Aurene to make his own name distinct from his father’s. Ryland and Braham are very similar in upbringing, both having strong lineages that ultimately only made them desperate to earn the notoriety of their names, which subsequently made them ripe for draconic manipulation.
These champions are empowered by their draconic ties but are still mortal at their core. What becomes of each champion in Dragonstorm’s battle between ice and fire is the biggest question on our lips as we explore today’s content drop.
Watching the below trailers will give you the fastest run-down of events possible if you need a lightning-fast TL;DR.
Dragonstorm
World boss and story conclusion
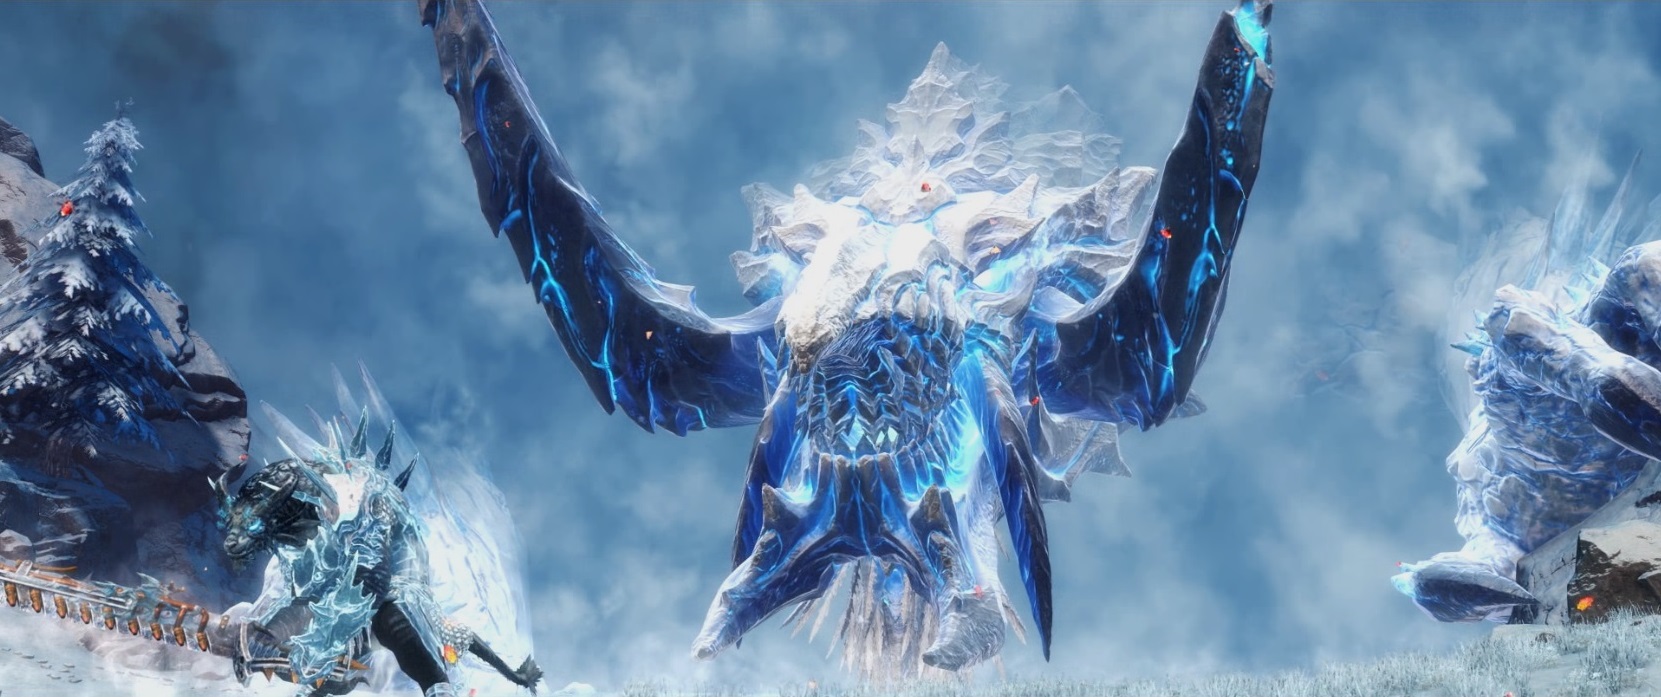
The final chapter of the episode concludes with Dragonstorm, a huge encounter between both dragons and their champions that pits fire against ice. This encounter is also found as a world boss, meaning that it is openly playable by anyone while the event is active by heading to Eye of the North. Players can also form a squad to start their own instances whenever they wish to. The flexible approach reinforces the mechanics in-story, allows for the maximum amount of players to take up the fight against the two great dragons.
My playthrough was in the private version of the battle, balanced for up to a 50-person squad, where we created a pre-set squad to enter Dragonstorm. I didn’t dare play the story version before today’s launch so I could get hit with all the feels at the same time as everyone else, so I have no clue who makes it – or perhaps more importantly, who doesn’t – at the time of writing. The story conclusion is yours and mine to uncover today, spoiler-free as ever.
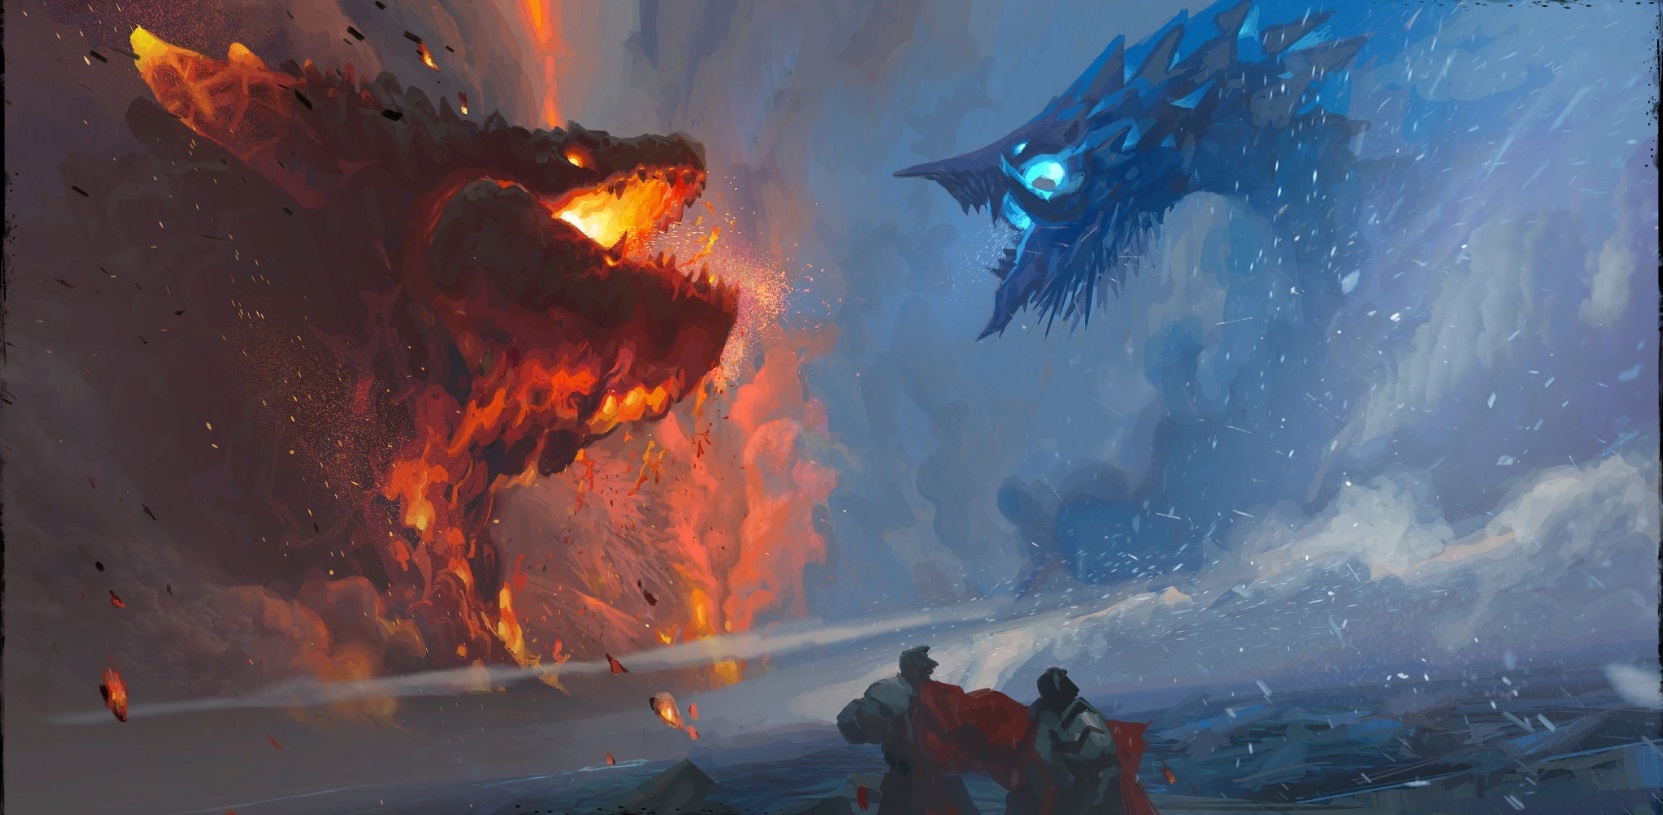
Both dragons must fall together
The main objective of Dragonstorm is to pit the awesome power of these two behemoths against one another. Primordus has been awakening for some time, gathering power as he extends his reach with his destroyers, and Jormag has quite a bit of time on him. Braham’s joining with Primordus brings the powers into equilibrium, however, meaning both are ready for battle. Remembering that these two dragons have also been drawing in the power from previously slain dragons, it’s clear that the commander and company aren’t going to be a match for either of them, let alone both dragons at once.
We’ve known for quite some time that destroying only one of these dragons would send a surge of magic so strong that the world would be destroyed into the survivor – remember Taimi’s calculations back in her lab? This is where the balancing act we’ve discussed in previous chapters comes into play – both Jormag and Primordus need to fall together or the consequences are dire, so the commander and Taimi plan on bringing both into a battle with each other where both must fall together.
The encounter
The commander and company first need to establish their battle location by setting up prisms created by Aurene to control dragon magic and lure the dragons to battle. It isn’t long before Ryland arrives, thanking us tauntingly for clearing his path for him, and the party must weaken him to draw his dragon to his aid. Note here that Ryland is much more powerful than before, as Taimi draws our attention to, though does have some mechanics familiar to those who’ve seen him before, so watch out for his telegraphs as you whittle him down. Ultimately, the disturbance brings Braham to the location upon weakening a retreating Ryland, and it’s clear he is not himself as he grunts draconically at his friends and claims he is Primordus. Again, the party weakens Braham to a point where his dragon will come too. Both early fights with the champions prep players for the mechanics ahead and form an effective primer for the main battle.
The pair of dragons arrive on the scene and goad each other, and the first threat the commander must quell is Jormag drawing yet more power from the ley lines. Players must destroy the ley line siphons while avoiding Jormag’s arsenal of callous attacks – this is a simple zerg around some map locations while keeping spawning creeps at bay. It feels comfortable enough to allow some ebbs and flows while still keeping in the players’ minds that there is no backup plan should Jormag beat Primordus in this battle.
Braham and Ryland have eyes for only each other and are locked in a magical clash while we deal with everything else, so players need to spam all those breakbar abilities to break up the tussle, and then the two champions need to be dealt damage separately in order to channel that damage back to their respective dragons. The pair deliberately stay in close range of their own dragon at opposite ends of the map to defend them, so your party will need to split in two to deal with them both.

One quirk here is that the two champions need to be defeated at the same time so that neither dragon gets to overcome the other due to the lack of defender, so communication will be key here, and I can already see how open-world commanders will need to manage this well. We failed to bring both champions down at the same time a few times in the last rotation and had to repeat this a few times to get it right, so this is definitely something to watch out for.
The dragons are far from peaceful while we fight their champions, so you’ll need to pay attention to various telegraphs that represent their ginormous breath attacks and aerial assaults. Clumping together for healing is prudent throughout this phase – be ready to assist fallen friends to keep your DPS high. Each dragon has two attacks: Jormag has a huge ice beam as well as frost lightning, while on the opposite end, Primordus has an explosive head slam and rock hurl that spawns Destroyers.
Once both champions are felled, it’s time to unleash the energy in our prisms on the two dragons, releasing their own energy back upon them. This is a special ability that players hurl at each dragon until both are damaged extensively. These phases loop thrice – fell the leyline siphons, break the champion tussle, zerg both champions down together, and use the prisms – each time, the health bars on all four parties are significantly weakened. Mushrooms and launchpads help with all the map navigation needed here – with two huge dragons and oversized champions, the map needs to be quite large so as to hold all the action, so this is very welcome.
The conclusion of the battle?
A wonderful cutscene plays that I won’t discuss just yet; it gives a sense of the battle’s epic proportions without spoonfeeding answers to the awestruck players. In the private squad mode, players collect their reward chest, and the map empties – in story mode, however, you’ll learn more about who survived this encounter as you survey the battlefield. Have we saved all Tyria? Did our allies make it? You’ll just have to play along to find out!
The Icebrood Saga in review:
 Flameseeker Chronicles is one of Massively OP’s longest-running columns, covering the Guild Wars franchise since before there was a Guild Wars 2. Now penned by Tina Lauro and Colin Henry, it arrives on Tuesdays to report everything from GW2 guides and news to opinion pieces and dev diary breakdowns. If there’s a GW2 topic you’d love to see explored, drop ’em a comment!


